Extending Dana 44 TTB

95_Bluwhale

Member
Joined
Jul 24, 2022
Messages
81
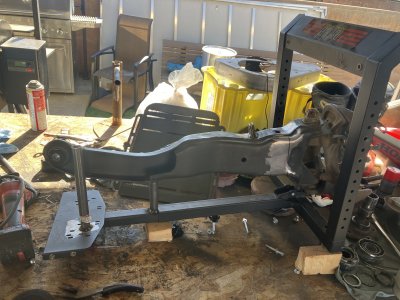
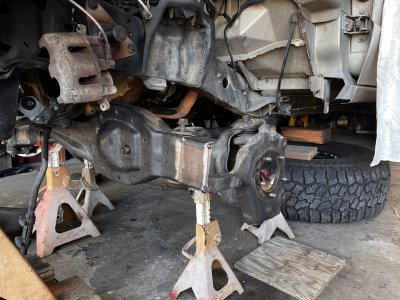
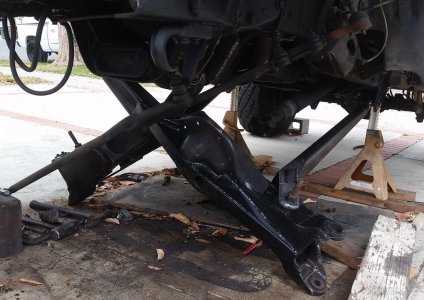
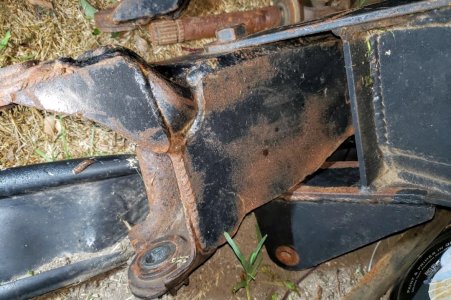
Any info on cutting and extending the beams on my bronco while keeping the solo radius arms I’m thinking cutting 1/4”-3/8” away from the threads on the side of the knuckle but need some help on best way to cut the beams straight and also have f someone can include the dimensions to make the extensions to match stock style plating would be great tried asking to buy some and even tried paying for some knowledge from Threat Motorsports and he got all pissy cause I’m trying to do the work on my own and not buy his full kit when I don’t need the full kit.
Yes I’m more than comfortable with attempting this and don’t want to go to a shop I can’t afford so just looking for tips and a little help.
 
Here is a picture from when I extended my dana 35 beams. Leave the radius arm pivot in the original location. Make sure you consider your camber and caster. You may need to extend it more on the bottom for your desired ride height.

You will need some some of overlay, front and back where you extend the beam and it’s preferable to have it top and bottom as well.

I’ve had issues with my beams cracking near the pivots so I would recommend filling boxing them up to the bushing or uniball.

If you do a uniball I would suggest using a hole saw and carbide bit on a die grinder to get the proper fitment. You can weld a piece of flat stock accross the center of the pivot to drill a hole in for the holes saw guide.

Another place my beams have cracked is near the diff mount on the outside of the driver beam. A gusset across the front of the entire beam would solve this.

I cut my beams with an angle grinder but a horizontal band saw would be preferred.

Dm me with any other questions, hopefully this helps
 

Attachments

  • 68886254466__F358F4A8-5FA4-47E1-81F6-6780A07F617C.jpeg
    68886254466__F358F4A8-5FA4-47E1-81F6-6780A07F617C.jpeg
    425.6 KB · Views: 35
Here is a picture from when I extended my dana 35 beams. Leave the radius arm pivot in the original location. Make sure you consider your camber and caster. You may need to extend it more on the bottom for your desired ride height.

You will need some some of overlay, front and back where you extend the beam and it’s preferable to have it top and bottom as well.

I’ve had issues with my beams cracking near the pivots so I would recommend filling boxing them up to the bushing or uniball.

If you do a uniball I would suggest using a hole saw and carbide bit on a die grinder to get the proper fitment. You can weld a piece of flat stock accross the center of the pivot to drill a hole in for the holes saw guide.

Another place my beams have cracked is near the diff mount on the outside of the driver beam. A gusset across the front of the entire beam would solve this.

I cut my beams with an angle grinder but a horizontal band saw would be preferred.

Dm me with any other questions, hopefully this helps
That’s how I plan on where im cutting mine and most of my beam is plated already just the side that needs extending is not plated when I first built it I left it so I can extend
 
The last 2 weeks iv been deep in the rabbit hole researching the cut and turn measurements and beam extension plans. What i've realized is bronco "builder" companys and people are very tight lipped about giving you any useful knowledge if you're trying to build yourself (like Myself) and you. If you aren't buying there overprised beams or kits good luck. I get it though they're in the business of making money and not giving out trade secrets. Anyways I stumbled across a thread on Go Fast Broncos that has some great knowledge and how to's for DIY beam builds and beam jigs for extending.

https://www.gofastbroncos.com/forum/viewtopic.php?f=15&t=10
 
I did the above ^^^ on my d35 TTbeams, but I built my own mounts and radius arms so I didn't care about it. I used an angle grinder to cut it off, and added caster to my extension section.

1704842743533.jpeg

1704842807776.jpeg
1704842818534.jpeg

This is just the beginning of the plating. I plated all around extensively.
1704842858390.jpeg

Here is the upper overlay plate that includes the mounting hole for the radius arm. The bottom plate has the lower hole.
1704842908779.jpeg
1704842963952.jpeg
 
Bodj did you do the camber correction in the extension plates aswell? I see you didn't cut the lower ball joint and push it out.
 
Bodj did you do the camber correction in the extension plates aswell? I see you didn't cut the lower ball joint and push it out.
I believe he did which would mess with the axles and probably have to clock his diff, mine is c&t already so straight plates to make the axle work like oem just longer and yeah it’s a secret nobody wants to spill and not a lot of info on forums
 
I believe he did which would mess with the axles and probably have to clock his diff, mine is c&t already so straight plates to make the axle work like oem just longer and yeah it’s a secret nobody wants to spill and not a lot of info on forums
So what measurements are you lower ball joints pushed out? I've seen a few people say 3/4" long beam 5/8" short beam. I think ultimately I'll just set my ride height and cut out the ball joint and set the knuckle at 0* camber then fill the gap. Its a beam its not going to space.
 
So what measurements are you lower ball joints pushed out? I've seen a few people say 3/4" long beam 5/8" short beam. I think ultimately I'll just set my ride height and cut out the ball joint and set the knuckle at 0* camber then fill the gap. Its a beam its not going to space.
My beams are c&t from solo motorsports so I’m not sure the bare c&t beams are what I was able to pick up from a guy selling his kit he never installed when building my truck
 
Bodj did you do the camber correction in the extension plates aswell? I see you didn't cut the lower ball joint and push it out.
I believe he did which would mess with the axles and probably have to clock his diff, mine is c&t already so straight plates to make the axle work like oem just longer and yeah it’s a secret nobody wants to spill and not a lot of info on forums

I didn't need to. I grafted the frame from an explorer onto my frame, and I offset the frames so the explorer frame is lower than the sonoma frame - essentially doing a drop bracket lift and letting me get more uptravel without the wheels crashing into AC components.
 
I didn't need to. I grafted the frame from an explorer onto my frame, and I offset the frames so the explorer frame is lower than the sonoma frame - essentially doing a drop bracket lift and letting me get more uptravel without the wheels crashing into AC components.
On one of the forums I was reading when you extend and turn the whole knuckle you’re messing with the angle the axle goes into the knuckle and that’s why usually you see the lower ear cut to avoid that and the one I saw with that method had to Clock their diff I’m pretty sure it’s on racedezert
 
I extended these 2" . I cut between the radius arm bung and the end of the housing. I pushed the lower ball joint tab out based on a measurement someone posted on the old forum. Camber was good with the old bushings still after. I did it dirty without a jig on the floor in my garage. They worked fine. Only swapped them out to go wider.
 

Attachments

  • Screenshot_20240112_105227_Photos.jpg
    Screenshot_20240112_105227_Photos.jpg
    1,001.7 KB · Views: 16
  • Screenshot_20240112_103851_Photos.jpg
    Screenshot_20240112_103851_Photos.jpg
    644.4 KB · Views: 17
  • Screenshot_20240112_103740_Photos.jpg
    Screenshot_20240112_103740_Photos.jpg
    963 KB · Views: 15
  • Screenshot_20240112_103712_Photos.jpg
    Screenshot_20240112_103712_Photos.jpg
    823.6 KB · Views: 20
Here’s the jig I whipped up from my old sim stand 😂yes the stand has an adjustment so after I cut it the stand will then be spread out to my dimensions needed
 

Attachments

  • image.jpg
    image.jpg
    339.7 KB · Views: 22
I extended these 2" . I cut between the radius arm bung and the end of the housing. I pushed the lower ball joint tab out based on a measurement someone posted on the old forum. Camber was good with the old bushings still after. I did it dirty without a jig on the floor in my garage. They worked fine. Only swapped them out to go wider.
What where those measurements on the lower BJ
 
If you’re intrested in the pate dimensions here are the dimensions from my beam although most beams will be different so probably make each plate the same inch number and make the fraction into 3/4 to make it easier ship is doing my plates for $20 each
image.jpg
 
Back
Top