1995 Ford F150 DD prelander

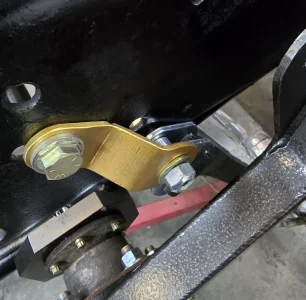
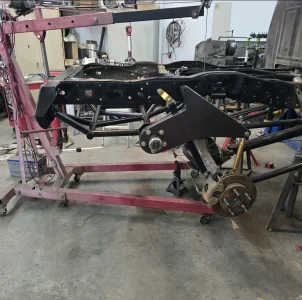
So that part of the job was this morning before lunch. Then I started making templates and the shock tabs. I'm only going to run a single coilover but I have enough room next to coilover between it and the bed. I know on the future I'll wish I had bypasses and doing upper mount will just have me design a bypass mount add onto the cantilever arms. I'll be finishing boxing in the tabs between them to box tubing between the mounts and on the rear flat surface

Screenshot_20240929_195124_Photos.jpgScreenshot_20240929_195104_Photos.jpgScreenshot_20240929_195045_Photos.jpgScreenshot_20240929_195053_Photos.jpgScreenshot_20240929_195115_Photos.jpgScreenshot_20240929_195021_Photos.jpgScreenshot_20240929_195028_Photos.jpgScreenshot_20240929_195001_Photos.jpg
 
OK so how the shock mounts finalized and boxing started. I welded the inner boxing rib on the inside before putting rear pieces on to get even more weld than needed. I also was able to retain factory bumper mounting holes so I can run stock bunper with some trimming on the brackets to get it all bolted up. This truck is gonna be a sleeper. Stock bumpers bug deflector on hood, fiberglass side steps and going to top it all off with a camper shell to make it the ultimate cool grandpa rig.
Screenshot_20240930_124348_Photos.jpgScreenshot_20240930_124358_Photos.jpgScreenshot_20240930_124406_Photos.jpgScreenshot_20240930_124414_Photos.jpgScreenshot_20240930_124423_Photos.jpgScreenshot_20240930_124434_Photos.jpgScreenshot_20240930_124445_Photos.jpgScreenshot_20240930_124453_Photos.jpgScreenshot_20240930_124500_Photos.jpgScreenshot_20240930_124509_Photos.jpg
 
I hope you use Tom's (BajaF250's) bullnose F250 for your inspiration.

file.php
 
OK more progress today. Started this morning with welding everything up. Once all welded deburred a few whiskers I saw and wire wheeled a few welds then test fitted the fuel tank in to see if I needed to do some sheet metal cradles to keep it from moving around and the front and rear angled pieces fits perfe try against the tank keeping it snug in place. Then factory upper straps can be used as the new hold down instead of skid holding tank up against those. I also mounted the tank 3/8" lower than before since the top of the tank was really close to bottom of bed and rubbed a few spots a tiny bit.

Screenshot_20241001_173151_Photos.jpgScreenshot_20241001_173142_Photos.jpgScreenshot_20241001_173136_Photos.jpgScreenshot_20241001_173127_Photos.jpg
 
Once all that was done i started shooting some primer on it before lunch so I could paint it after eating. Then of course I ran out of paint so had to drive 30 min each way to buy more paint and a few other misc items when in town. Frame is painted with some Krylon Rust tough paint I had on my shelf. Cantilever arms i wanted something to contrast the all black everything so went with hammered black which looks charcoal grey to me. Now it gets to dry all night, then tabs for brake lines on axle, more paint then fi al assembly.
Screenshot_20241001_173119_Photos.jpgScreenshot_20241001_173053_Photos.jpgScreenshot_20241001_173107_Photos.jpgScreenshot_20241001_173100_Photos.jpg
 
OK ran errands this morning, sold some stock bronco parts, picked up camper shell then started assembly. I did limit straps mounts and made a double shear tab. We'll original location was too far from frame and would hit the spring so I moved it to new location and it is close to the cantilever arm but clears so we're good there. Need to weld tabs for brake lines on axle then paint, shorten reservoir hoses to mount those next to cell on cradle and more assembly tomorrow. Should have it all wrapped up tomorrow or Thursday since there's always a ton of little things that take way longer than anticipated during assembly.
IMG_20240929_191730_388.jpgScreenshot_20241002_182304_Photos.jpgScreenshot_20241002_182315_Photos.jpgScreenshot_20241002_182323_Photos.jpgScreenshot_20241002_182329_Photos.jpgScreenshot_20241002_182339_Photos.jpg
 

Attachments

  • Screenshot_20241002_182346_Photos.jpg
    Screenshot_20241002_182346_Photos.jpg
    747.2 KB · Views: 10
  • Screenshot_20241002_182409_Photos.jpg
    Screenshot_20241002_182409_Photos.jpg
    852.3 KB · Views: 11
Sweet. I had this idea for a leaf sprung setup, off the shackle. Was worried tho that it be to much for the main leaf. Then I remember I don’t want leafs anymore and going this route or a “short course” link setup. Looks great!
 
Yeah I'm all about linking trucks. I ran 62" deavers on my Tacoma for 2 years and they worked but never as good as a linked truck for me since I never spent the time tuning the shocks perfectly.
 
Same. @DialedShockPrep had mine pretty tits on the base tune then; I saw PBtaco, I think on DR?, rip with the same front end, motor and thought to myself. Never again. Haha
 
OK shocks 90s and Installed and reassembled with shorter hoses which made the chaffed section of hoses get removed. Brake line on axle fabbed up with tabs to secure it all. Shocks bumps and straps are on the truck now. A lot of little misc items to finish up now before it's ready to drive out of the shop.

20241003_095632.jpg20241003_095634.jpg20241003_095636.jpg20241003_104649.jpg20241003_121020.jpg20241003_121028.jpg
 
OK Gas tank is in, i also paint pen the filler neck orientation since tightening that hose clamp once bed was on was real difficult, and some rubber adhesive strips between tank and cradle and hold down straps. Rear just needs reservoirs mounted which the mounts come tomorrow for that. Lift it up in the morning to do proportion valving and I also have a punisher valve body to install with new filter AND a bung for temp sensor to be installed on the pan to wire up to the gauge I'll mount in the cab along with the race radio I have for this truck. I'll cut and angle the tail pipe perfectly once bed is installed as well

20241003_154608.jpg20241003_154501.jpg20241003_154546.jpg20241003_165145.jpg20241003_165150.jpg20241003_165203.jpg20241003_133514.jpg
 
I also got a bronco fuel pump access panel cover that was in one of the broncos i parted out in my yard. So sprayed that with some bedliner tonight so it will dry tomorrow so I can. Measure and cut access hole in bed before reinstallation.
 
Back
Top