You are using an out of date browser. It may not display this or other websites correctly.
You should upgrade or use an alternative browser.
You should upgrade or use an alternative browser.
The Grand Tracker (Retard TT)
- Thread starter 84projectFORD
- Start date
84projectFORD
Well-known member
- Joined
- Apr 1, 2022
- Messages
- 339
Yeah I planned on asking Minh tomorrow. Not going to bug him on the weekend. He asked me before putting them in if I wanted them in one of the two places and I totally figured toward the front would be no issues. Go figure. Either way, I can’t see it being that big an issue to plug off and move even if I gotta do it
84projectFORD
Well-known member
- Joined
- Apr 1, 2022
- Messages
- 339
7/5
Well t/c power steering pump won’t work to drop in the factory spot. Bolt pattern is way off. Figured I’d try pulling apart my stock pump and try bumping pressure and flow from a UK thread I found for a vitara. Weeeeelllllll my pump ain’t the same on the pressure relief and I destroyed the thing taking it apart to see how it worked. Soooo I’m going to cut up the stock mount and make a T/C style pump work. May have to canibalize my pulley to get the right dia but we will cross that bridge when we get there.
But got the steering in, had to put a little bend in the pass tie rod to clear the shock mount. Fuckin stock one cleared but I ordered the bigger ambulance shit and it hits. Ignore the shock mount clearancing, I’ll be filling that back with weld. Then cleaned up fuel and brake lines under the rig so they are now hard mounted and started to figure out how to mount the oil cooler and radiator before I do the bumper. I’m really tempted to leave the oil cooler in this spot and put some holes in the crossmember for air flow


7/6
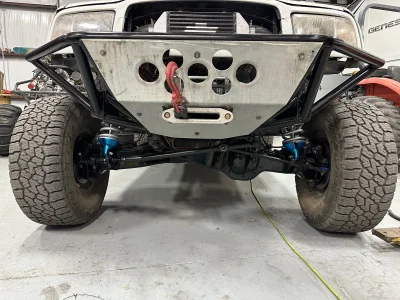
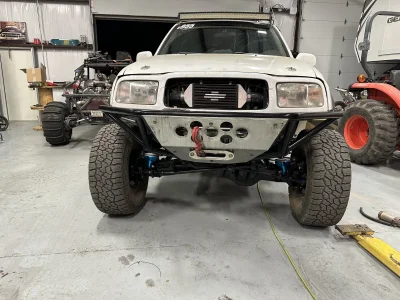
Oil cooler mounted, radiator mounts made, and started on the bumper. Winch will be near the bottom of the bumper and incorporated into it. Bought a China freight winch plate only to not use it lmao. Oh well. Might cut it up to use as the bracket in the bumper. List is getting smaller!


7/7
Bumper is all tacked together and winch drops right it without issue. So much nicer than it was before and damn I like this bumper way more.


Well t/c power steering pump won’t work to drop in the factory spot. Bolt pattern is way off. Figured I’d try pulling apart my stock pump and try bumping pressure and flow from a UK thread I found for a vitara. Weeeeelllllll my pump ain’t the same on the pressure relief and I destroyed the thing taking it apart to see how it worked. Soooo I’m going to cut up the stock mount and make a T/C style pump work. May have to canibalize my pulley to get the right dia but we will cross that bridge when we get there.
But got the steering in, had to put a little bend in the pass tie rod to clear the shock mount. Fuckin stock one cleared but I ordered the bigger ambulance shit and it hits. Ignore the shock mount clearancing, I’ll be filling that back with weld. Then cleaned up fuel and brake lines under the rig so they are now hard mounted and started to figure out how to mount the oil cooler and radiator before I do the bumper. I’m really tempted to leave the oil cooler in this spot and put some holes in the crossmember for air flow


7/6
Oil cooler mounted, radiator mounts made, and started on the bumper. Winch will be near the bottom of the bumper and incorporated into it. Bought a China freight winch plate only to not use it lmao. Oh well. Might cut it up to use as the bracket in the bumper. List is getting smaller!


7/7
Bumper is all tacked together and winch drops right it without issue. So much nicer than it was before and damn I like this bumper way more.


84projectFORD
Well-known member
- Joined
- Apr 1, 2022
- Messages
- 339
We are almost ready to RIP!!
Started out saturday morning putting the power steering return hose in. Next I got the welder high idle adjuster mounted and then painted the engine crossmember.
While that dried, I decided to find a spring to keep the stub shaft in the diff and make the slip yoke do the slipping. Spring from my hydro bumps, couple tacks, good to go

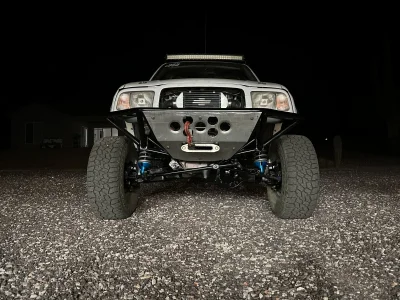
Next up I started in the winch fairlead and skid plate. That took most the day. The old bumper made the rope always “pull down” on the fairlead anytime you used it. This time I did a boxed in hole so the rope comes straight out the bottom of the winch like it should. Trimmed the fairlead down as well for a little more clearance. 3 center holes are dimple died but the other 4 are not. I didn’t leave enough room but don’t look too bad.


With that done, painting time. Ran out of paint so I’ll finish tomorrow. Then while it dries, I’ll start on the shocks and get those done. If things go well, it will be on its own weight and running tomorrow!


Started out saturday morning putting the power steering return hose in. Next I got the welder high idle adjuster mounted and then painted the engine crossmember.
While that dried, I decided to find a spring to keep the stub shaft in the diff and make the slip yoke do the slipping. Spring from my hydro bumps, couple tacks, good to go

Next up I started in the winch fairlead and skid plate. That took most the day. The old bumper made the rope always “pull down” on the fairlead anytime you used it. This time I did a boxed in hole so the rope comes straight out the bottom of the winch like it should. Trimmed the fairlead down as well for a little more clearance. 3 center holes are dimple died but the other 4 are not. I didn’t leave enough room but don’t look too bad.


With that done, painting time. Ran out of paint so I’ll finish tomorrow. Then while it dries, I’ll start on the shocks and get those done. If things go well, it will be on its own weight and running tomorrow!


84projectFORD
Well-known member
- Joined
- Apr 1, 2022
- Messages
- 339
I was really hoping to have this thing rolling and moving by today but there’s so much little shit to tidy up it didn’t happen.
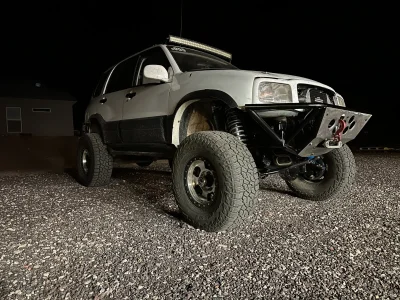
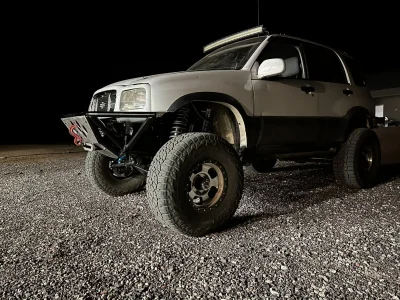
Hit the local ace for paint and hardware and then finished up painting the rig. While it dried, I yanked the shocks apart to try out fittings. 90* wasn’t going to work but the 45 was tits. After putting one half way back together and filled/cycled the oil, I jumped on the bumps. The shocks needed time to let the air bubbles escape. Shortened up my bumps to 3” and out back together. Then put the shock back together. Threw the passenger side together and made my pee pee hard looking at it

Swear to god these pics do not do the shocks justice in size.
Ate lunch and then did the driver side shock and bump. Once installed, I tighten all the beam bolts, radius arm bolts (shit, as I’m typing this I just remember I didn’t tighten the jam nuts on the heim joints) and tried to finalize everything under the rig.
Next up was putting the winch and skid plate on.

Just need to tie up the wires and hook the oil cooler fan wires up.
And finally I started putting the engine stuff on top back together. Got the power steering fluid in and mostly bled and it was dinner time. I’m spent anyhow.
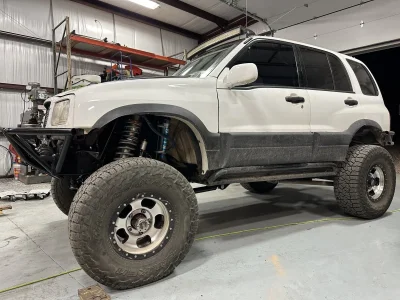
Obligatory side shot

Still need a driveshaft, tcase shifter setup and reroute exhaust. Think I’m going to run a Bluetooth driveshaft if I can get it ready for Parker this weekend. We will see
Hit the local ace for paint and hardware and then finished up painting the rig. While it dried, I yanked the shocks apart to try out fittings. 90* wasn’t going to work but the 45 was tits. After putting one half way back together and filled/cycled the oil, I jumped on the bumps. The shocks needed time to let the air bubbles escape. Shortened up my bumps to 3” and out back together. Then put the shock back together. Threw the passenger side together and made my pee pee hard looking at it

Swear to god these pics do not do the shocks justice in size.
Ate lunch and then did the driver side shock and bump. Once installed, I tighten all the beam bolts, radius arm bolts (shit, as I’m typing this I just remember I didn’t tighten the jam nuts on the heim joints) and tried to finalize everything under the rig.
Next up was putting the winch and skid plate on.

Just need to tie up the wires and hook the oil cooler fan wires up.
And finally I started putting the engine stuff on top back together. Got the power steering fluid in and mostly bled and it was dinner time. I’m spent anyhow.
Obligatory side shot

Still need a driveshaft, tcase shifter setup and reroute exhaust. Think I’m going to run a Bluetooth driveshaft if I can get it ready for Parker this weekend. We will see
84projectFORD
Well-known member
- Joined
- Apr 1, 2022
- Messages
- 339
Desolate makes one but I wasn’t going to spend the money. I was going to send it without it but my conscious would not let it go. I didn’t want the stub shaft to be half way out of the diff splines when I’m trying to rock crawl an obstacle and then have it blow or rip splines off.External spring for pass stub shaft is genius. I need to look into that for my truck since currently the block height of my retaining spring limits my droop travel
So far this works well when cycling. See how long it lasts
Kellyex1450
Well-known member
Any plans for the rear suspension after this? I feel like the rear may have a hard time keeping up with those sweet whoop scissors.
84projectFORD
Well-known member
- Joined
- Apr 1, 2022
- Messages
- 339
I hope the rear can’t keep up! I’ve yet to use it anywhere near its full potential. Still got more valving to play with, crossover to dial in and even springs if I need to.
But if I need more, I have a set of 2.5” sway away 3 tube bypasses I can put in place of the coilover and then figure out how I want to spring it.
Or I REALLY go full retard, put longer links on, put the coilovers and bypasses into the cab and ran like a traditional trailing arm setup but loose my back seats… na not goin that far. Need to take the kiddos and momma on runs still lol.
I’ve tossed around the idea of air bagging off the trailing arm so I can just swap the coilover to bypasses but I don’t care for the progressive rate and trying to make that all work. Barge and I went back and forth on that for a while. I’ve thought about doin a linkage setup like a dirt bike and running a short shock mounted kinda like a traditional trailing arm but never put a time into the design. We will see, I’m sure there are options I can come up with.
I’ll just be glad to have a front end that will hold up like it should. That old front end did well but she was getting out driven over the last couple years and it was always only suppose to be temp lol
Kellyex1450
Well-known member
The biggest thing I did to pump up my poor little 2.0s on my rear setup similar to yours is put reservoir adjusters meant for 5/8s shafts on my 2.0s with 7/8s shafts which helped dramatically with blowing through travel on out of rhythm moon bumps and g outs.
84projectFORD
Well-known member
- Joined
- Apr 1, 2022
- Messages
- 339
Funny you say that. I have a set on the shelf ready to go in if needed lol.The biggest thing I did to pump up my poor little 2.0s on my rear setup similar to yours is put reservoir adjusters meant for 5/8s shafts on my 2.0s with 7/8s shafts which helped dramatically with blowing through travel on out of rhythm moon bumps and g outs.
84projectFORD
Well-known member
- Joined
- Apr 1, 2022
- Messages
- 339
the bodj
Well-known member
Dude yes! Stoked for you! Can’t wait to hit dirt with our whoop scissors!
84projectFORD
Well-known member
- Joined
- Apr 1, 2022
- Messages
- 339
Agreed! We will kill all the nuns the moment our powers link upDude yes! Stoked for you! Can’t wait to hit dirt with our whoop scissors!
Midget Nate
Active member
Hopefully with enough peer pressure The Grand Tronco rips up shea road this weekend
Giant Geoff
Well-known member
So fricking cool! That is bad ass!
Rear is going to suffer now. Haha
Rear is going to suffer now. Haha
Kellyex1450
Well-known member
UR_Mawm69
Well-known member
psh.
hah.. gayyyyyyyyyyyyyyyeeeeeeeeeeeeeee
hah.. gayyyyyyyyyyyyyyyeeeeeeeeeeeeeee
84projectFORD
Well-known member
- Joined
- Apr 1, 2022
- Messages
- 339
I honestly can only hope. It’s been years of the front end being insufficient. The only plus I got going for me is the ass end is light. 1200ish lbs sprung weightSo fricking cool! That is bad ass!
Rear is going to suffer now. Haha
Similar threads
- Replies
- 17
- Views
- 591
- Replies
- 22
- Views
- 398
- Replies
- 10
- Views
- 406
- Replies
- 20
- Views
- 772

