Roger The Raptor

Do you DD this with the cooler, first aid kit, powertank and everything in the bed? I live in a shitty area but even if I lived somewhere nice I wouldn't trust people not to take something.
 
Roger got upgraded brakes! The new PowerStop Z36 package with drilled/slotted rotors. I painted the calipers with dupli color gloss black caliper paint.

IMG_3532.webp

IMG_3528.webp

IMG_3530.webp

IMG_3535.webp

After doing the specific break in procedures I wanted to take it for a long drive to get them seated. Gave me an excuse to get out of the house. So I did a huge loop up and around Lake Kaweah which ended up being about 100 miles, only about 5-10 miles on dirt but it was a good time.

IMG_3544.webp

IMG_3546.webp

IMG_3552.webp

IMG_3553.webp

IMG_3555.webp

IMG_3558.webp

IMG_3564.webp

IMG_3565.webp

IMG_3567.webp

IMG_3568.webp

Lastly, yesterday I ripped the Swagman bike racks off the 4Runner’s roof rack since we don’t really use it much for camping anymore. I got them to fit the cross bar rack on the truck. With a little bit of modification I was able to get them to work.

IMG_3571.webp

IMG_3573.webp
 
Finally received my long awaited rock guards from ROKBLOKZ. The fronts will prevent the dreaded pie shaped sand blasted area on the bottom corner of the front doors in between the fender flares and the steps (it’s a common problem). The rears will prevent rocks from hitting the front of the travel trailer when towing. When it’s time to remove them they are off in 5 minutes. A little different but I dig the look with them on. Im doing 220 plus miles after V2R on my way home so I think these will definitely help.

IMG_4126.webp

IMG_4136.webp

IMG_4138.webp

IMG_4143.webp

IMG_4145.webp
 
I haven't moved them since they've been installed.

There's a guy on a Gen1 facebook group I'm on who makes mounts that move the resi up which I have considered.

In one photo it looked like the resi was behind the front wheel but I looked again and see now it's forward.

I just scored some used 3.0s and I gotta figure out where I'm going to mount the resi.
 
Getting the truck prepped for V2R. We leave Thursday! I did a once over last week and noticed the inner CV axle boots didn’t look the greatest. Pretty weathered. Outers were ok. I don't have the funds or the time to change the CVs out or try to replace the boots so after doing some research I found that Seal Savers makes a CV boot protection kit that’ll prolong the life of the boots long enough for the trip 🤞. I plan to replace the CVs when I get back home. The 930 CV seal savers is what I purchased and they fit damn near perfect. Other than that Roger is ready for another 1k mile trip.


IMG_4277.webp

IMG_4289.webp
 
How are the seal savers holding up? Notice any driveline vibrations or anything weird?

Sean
 
How are the seal savers holding up? Notice any driveline vibrations or anything weird?

Sean

So far so good! I'm almost afraid to open them up but no grease flinging externally as of now. I bought new boots and grease to rebuild the current CVs when that time comes, but I may not have time to do them before the next trip, so i might just buy a brand new set, rebuild old ones when i have time and have an extra set.

No vibrations at all, even with the RCV IWE deletes in. regardless of what i end up doing I'm slapping the Seal Savers back on.
 
Guys throwing thousands of dollars at their Gen 1s like it’s nothing these days and I’m over here excited about adding a basket to my cross bars lol. I figured out a way to mount this old Harbor Freight receiver rack. I had all this stuff laying around so it didn’t cost me a dime aside from my time. Removed the receiver tube, found some bushings to take its place, found long enough carriage bolts, found these four 1/4x20 knobs from an old bike rack, cut and welded some bolt keepers that slide into the channel of the cross bars, drilled some holes in the rack tubing and it is solid. I’m actually pretty proud of it lol. Goal is to have a good spot for firewood or other gear, and a good spot to put trash for Clean ups. When I don’t need it, it takes 2 minutes to remove. I still need to paint it, and I want to put an aluminum floor in it.

IMG_5011.jpeg

IMG_5012.jpeg

IMG_5018.jpeg

IMG_5019.jpeg

IMG_5021.jpeg

Also, other unimportant things, I ditched the Mob Armor phone mount and went with a Ram Mount. I love the Mob Armor stuff but the last trip my phone fell off twice because the magnet couldn’t keep up through the rough. I attached this new Ram Mount to my Bodj Built radio cover. We’ll see how it works out next trip.

IMG_4948.jpeg
 

Attachments

  • IMG_5016.webp
    IMG_5016.webp
    492.4 KB · Views: 10
  • IMG_5014.webp
    IMG_5014.webp
    493.9 KB · Views: 10
  • IMG_5010.webp
    IMG_5010.webp
    1.3 MB · Views: 13
Last edited:
Guys throwing thousands of dollars at their Gen 1s like it’s nothing these days and I’m over here excited about adding a basket to my cross bars lol. I figured out a way to mount this old Harbor Freight receiver rack. I had all this stuff laying around so it didn’t cost me a dime aside from my time. Removed the receiver tube, found some bushings to take its place, found long enough carriage bolts, found these four 1/4x20 knobs from an old bike rack, cut and welded some bolt keepers that slide into the channel of the cross bars, drilled some holes in the rack tubing and it is solid. I’m actually pretty proud of it lol. Goal is to have a good spot for firewood or other gear, and a good spot to put trash for Clean ups. When I don’t need it, it takes 2 minutes to remove. I still need to paint it, and I want to put an aluminum floor in it.

View attachment 28365

View attachment 28366

View attachment 28369

View attachment 28370

View attachment 28371

Also, other unimportant things, I ditched the Mob Armor phone mount and went with a Ram Mount. I love the Mob Armor stuff but the last trip my phone fell off twice because the magnet couldn’t keep up through the rough. I attached this new Ram Mount to my Bodj Built radio cover. We’ll see how it works out next trip.

View attachment 28372
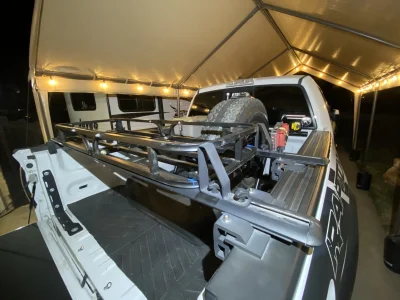
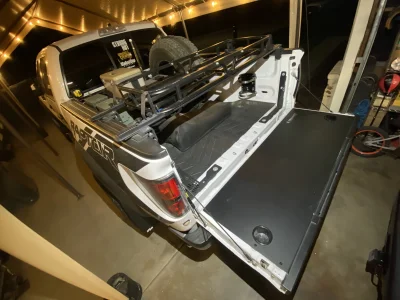
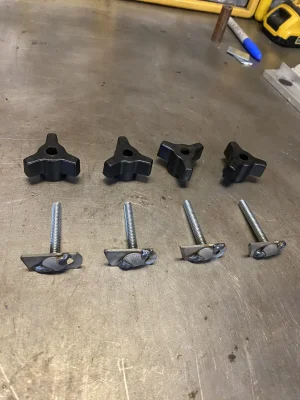
I had a similar idea on my ranger since I don’t have much room. Came out nice.
 
The guys dropping thousands aren't the ones building it themselves or knowing how their truck works. Keep up the solid work! I enjoy watching people add parts to their trucks, but I love watching people customize things to make it their own and fit their needs.
 
What a pain in the dick. 4 hour job total. 3M eraser wheel, a $17 dollar harbor freight corded drill, some GooGone and wax. The drill failed around 98 percent completion lol. I’m surprised it lasted that long to be honest. Finished the job with my Dewalt cordless drill. HF drill will be returned tomorrow lol. Decal was sun baked and just looked terrible. Much cleaner look now!

IMG_5152.webp

IMG_5156.webp

IMG_5159.webp

IMG_5154.webp

IMG_5158.webp

IMG_5167.webp

IMG_5172.webp

IMG_5175.webp

IMG_5176.webp


IMG_5178.webp

IMG_5179.webp
 
Back
Top