1992 4runner, South Eastern Pre-Crawler

5lugger95

Member
Joined
May 9, 2022
Messages
38
This will be my third attempt at ruining a perfectly good Toyota, but my first go at it with some actual (albeit small) funding and proper tooling. Having had a fully caged 92 pickup and it not giving me any issues chassis wise, I knew I wanted to stick with the 89-95 platform. I am also a believer in more people more fun so I started looking for 2nd gen 4runners.

And one day this green machine graced my marketplace for $600 20220911_095002[1].jpg

20220910_135022[1].jpg

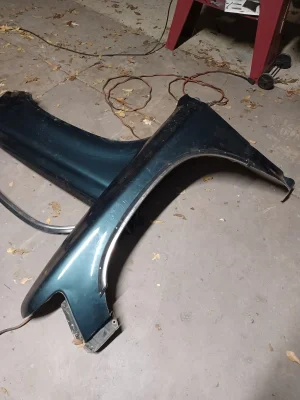
Ole girl is a 1994 4x4 auto 4runner with a blown 3.0 that the prior owner had half torn into. I decided that I didn't want to deal with someone else mess and promptly ripped that thang out. I luckily found a 94 t100 with questionable history and a good 3.4 in it for $500:

20220912_171940[1].jpg20220915_184518[1].jpg


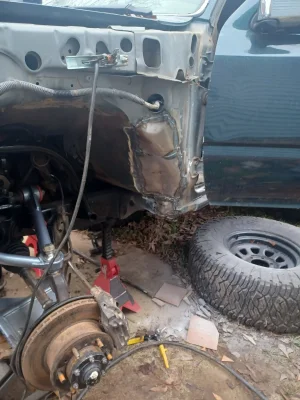
I had a wheeling trip planned two weeks out, so I started thrashing on the 3.4 swap. In total, including the t100, the swap cost me around $700. It was a lot of straightforward work and a bit of headache when trouble shooting the wiring situation. 20220918_171121[1].jpg20220922_210800[1].jpg20221003_084505[1].jpg20221003_160711[1].jpg
 
I got the 3.4 running good enough for some stock mobbing action out at Uwharrie in North Carolina. The only issue I had, is the auto trans seems to be unsure of what to do when I put it into drive. There is a big delay, and then if I dont take advantage of it realizing it is in drive and giving it a bit of throttle, it goes back into limp dick mode. Once you got her going, she acts normal but on initial take off the trans is short a few brain cells. I want to keep it auto so my friends who arent used to stick can wheel it. More trouble shooting to commence.20221009_132611[1].jpg20221008_123624[1].jpg

With that being said, the truck did great on its first trip out and wasn't touched by a single wrench the whole two days.
 
That brings us up to its current state of being.

I live in the South East at the moment and most of the offroad opportunities out here require a bit of mud and rocks to be conquered. We do have our fair share of go fast stuff too and thats what I really enjoy, so the goal of this truck is to have a good all arounder that can safely wheel four people, drive to work if I wanted, and still be able to toss around quickly without feeling like a top heavy turd.

I think the formula is: 35s, TC front kit, sliders, winch, auto trans, and either a really well tuned rear coil spring setup OR h70s.

I began by throwing on the 35s for motivational purposes.. I scored these brand new maxxis tires off Mickey Thomas, who may be the only short course racer out of the south east. Really nice dude from the short interaction I had with him. His garage was out of control with toys, but I thought it would be weird to take pictures lol.

ole girl got them BIG MEAT LARRY HOOVERS
 

Attachments

  • 20220920_065514[1].jpg
    20220920_065514[1].jpg
    208 KB · Views: 8
  • 20221025_145704[1].jpg
    20221025_145704[1].jpg
    635.8 KB · Views: 11
I started building a front kit for the 4runner with the idea of extending the lower arm and making a tubular upper... All was great until one Saturday when the boys hit me up to go on a mountain bike ride and I was working on the kit.. So I caved, gave poly performance $2500, and went and rode my bicycle. No ragretz!

I'm building the hoops myself instead of buying the TC kit hoop kit as a compromise to my pride and bank account for buying the arms. So far I've been please with how things are turning out.
Tools:
Welder: Eastwood 180
Bender: Affordable bender (eh....)
Notcher: 3d printed guides and a band saw/cut off wheel
3D Printer: Ender 3 S1 (love the s1) 20221125_085816[1].jpg20221125_104706[1].jpg20221125_124614[1].jpg20221111_173902[1].jpg
 
Looks great man! Pretty jealous of the 3d Printer work. If I knew how to use Solidworks or other programs like that then I'd have one for sure.

@FabienFlorent on here is a wise on building up custom Toyota stuff. Maybe he can chime in on the build!
 
Looks great man! Pretty jealous of the 3d Printer work. If I knew how to use Solidworks or other programs like that then I'd have one for sure.

@FabienFlorent on here is a wise on building up custom Toyota stuff. Maybe he can chime in on the build!

Thanks Wally, look up Fusion 360 mane! Honestly, there is no reason that someone who can post on a forum can't be designing their own stuff in CAD these days.
Its way easier then building a truck haha.

If you really want to have the skill, download Fusion 360 (free 3d CAD that is rivaling solidworks), prusa slicer (the program that takes the CAD file and changes it to a gcode the printer can read), buy an ender 3 S1 printer, and have fun!

I reckon most people have the ability to be designing and printing their own stuff in one day.
 
Do you still have the T100? Do you have the crossmembers for the front suspension? I bent mine and have been looking for replacements or I was going to build new ones.
 
Do you still have the T100? Do you have the crossmembers for the front suspension? I bent mine and have been looking for replacements or I was going to build new ones.

I do not :-/ I was worried someone was going to come looking for it so I resold it on marketplace for $100 lol
 
Finished up the TC install and clearanced for 35s. It was my first time tubbing a firewall and i give myself a 5/10, its fully functional and fine, but the welding was lack luster due to me being to excited and not cleaning the toyota metal good enough.

For now im going to run the stock fenders trimmed and was a bit worried about the look. However, i was able to use the OE molding as a cut guide and then rivet it back on once i cut the fender to clear the 35s. I think it looks kinda cool.

Still need to seam seal/paint the firewall, bleed the brakes, do an alignment, and a final bolt check. Finished pictures to follow.
 

Attachments

  • 20221212_182158.jpg
    20221212_182158.jpg
    257.4 KB · Views: 24
  • 20221211_112143.jpg
    20221211_112143.jpg
    276.6 KB · Views: 25
  • 20221212_163902.jpg
    20221212_163902.jpg
    372.9 KB · Views: 24
I like the trimmed up stock fenders!

Maybe it's the inner redneck in me that loves this look because all of the rock crawler guys do it.
 
I like the trimmed up stock fenders!

Maybe it's the inner redneck in me that loves this look because all of the rock crawler guys do it.
She'll be getting Hannemann flat tops eventually, but for now shell embrace her southeast roots and rock the trimmed sheet metal
 
Got the green machine road worthy recently, also figured out the trans issue which im really happy about. These transmissions have a line pressure cable that varies line pressure relative to throttle. I broke that cable during the 3.0 removal and figured it wasnt critical to operation. Since i was having trans problems after the 3.4 swap I threw a freshy cable in and to my amazment the trans is working 100% as intended. I want to keep this thing auto so friends and family can wheel it as well.

Needs an alignment but everything inside and out is functioning well. Onto bumpers sliderzz and rear FOA installation. Picz at the local enduro leg stretching zone


20221227_164729.jpg20221227_164745.jpg
 
Recently built a set of sliders out of 1.5x.120 DOM, this was a good project to work on my notching skills, and I was able to get substantially better fitment towards the end of the project.

I ended up resorting to a 4.5" cutoff wheel and flap disk for all my notches and feel super confident in making clean repeatable copes now. PXL_20230114_130405551.jpg
 

Attachments

  • PXL_20230114_130356003.jpg
    PXL_20230114_130356003.jpg
    502.3 KB · Views: 5
  • PXL_20230113_181201244.jpg
    PXL_20230113_181201244.jpg
    580.3 KB · Views: 6
Also got around to mounting my 2.5x12 FOA smoothies, required a frame notch and 1.25" wheel spacers but I'm pretty happy with how it came out. Cycling about 13-14 before the upper arm hits the gas tank, I think it should clearance itself a bit.

I really wanted the shocks to be out of the way of rocks etc... so the closer I could get them to the tires, I figured the better. I built a mount off the OE shock tab and the back of the lower control arm bracket, Ill add some plate work to them eventually. Having them outboard of the frame and close to the end of the axle should help with body roll as well.

So far so good with the FOAs, they were not leaking out of the box and have been holding in their innards for a few weeks now. Picked the regular flow piston, 12s on compression and 8s on rebound, might be kinda light on rebound but we will see! PXL_20230205_212829501.jpgPXL_20230205_212842288.jpgPXL_20230205_212849648.jpgPXL_20230205_213152467.jpg
 
Last edited:
Spent this past weekend really getting to test out the truck for the first time. We took a two day trip to Windrock Tennessee, which is a 70,000+ acre offroad park in eastern Tennessee (some of you may know it if you follow DH mountain biking/Neko Mulally's escapades). The park has hundreds of miles of sanctioned trails and many more that are off the map. There are all sorts of coal mines, old trains, mountains, waterfalls, etc to explore on the property.

The below pictures are mostly of trail 13, which has a few abandoned coal mines, caves, waterfalls, and a really cool looking bog.

The truck did fantastic all weekend and didn't request anything but a bath at the end of the trip. I was actually pretty happy with how the rear ended up working and the FOA's surprisingly still aren't leaking (and actually felt pretty good). Take aways are that the truck needs a spool in the rear and a better solution to tie stuff down in the back.


PXL_20230211_204449055.jpgPXL_20230211_192622193.jpgPXL_20230211_192536395.jpgPXL_20230211_193025897.jpgIMG_20230209_195415_393.jpgPXL_20230211_192250082.jpg
 
Last edited:
Back
Top