The Baja350 - a Dentside Story

10/25/2020:
Transmission news: Apparently converting a 4L80 from 2wd to 4x4 is not possible by simply cutting the output shaft of the transmission.

The input shaft of the transfer case, mine is a NP241, hits an increased-diameter section of the output shaft and prevents the flanges of the t-case and the trans from contacting.
I had to take the trans back to the shop and for $200 they swapped the output shaft to the appropriate 4x4 one.
I suppose it would have been possible to cut the input of the t-case and make this work but I chose to have less custom parts for the sake of future serviceability or upgrades that either I or some future owner may want to do.

QlqkbQ7.jpg

6TZe5Xe.jpg


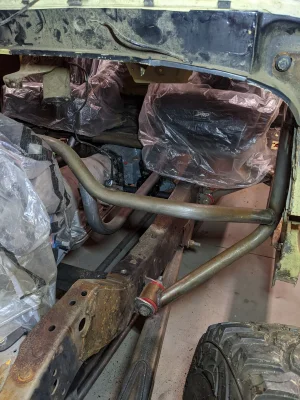
With the right parts, all put together. T-case not actually clocked here:
KQir1eA.jpg


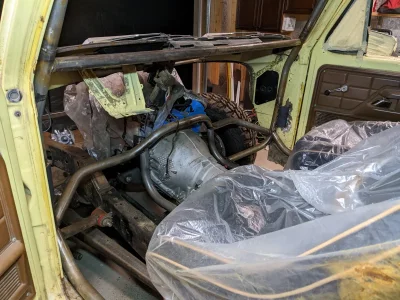
Then just for funsies. The original old man owner of this thing must have had a CD changer in here & he had this cheat sheet on the door of the glove box.
I'm probably going to leave that there. Quirky bit of history on the truck.
P9WK8q4.jpg
 
11/3/2020:
Got a big order of bearings & such from FK so I started assembling the steering to get some first looks at clearances. All the hardware in the pictures below is intentionally long so I can cut them down for shanking. The coating on these is magni565 or "armor coat" on mcmaster. sometimes also called zinc-aluminum coating but this stuff is the bee's knees. We use it all over our marine applications at work and it holds up vastly better than conventional yellow zinc that you get on normal grade 8 harwdare. highly recommend.
Bummer i'm going to expose bare metal when I shank the bolts, but at least it'll only be the end. will have to touch up paint them i guess.

The hardware stack in Cho's steering swingers also gets a thumbs up from me. These use 2 press-in spherical bearings on each end with a machined steel sleeve that engages ~1/2 the bearing race on each side then a misalignment spacer covers the other half and is your interface with the welded bracket. Much better than a rubber bushing with a sleeve down the center like I had on the last truck.

HwRWnps.jpg

rN69nB4.jpg


Front bypasses arrived. 3.0" x 14", 1" rebound tubes, custom tube layout w/ black cerakote body. Thanks @Andrew & Raker!
ErF2vT8.jpg


Andrew and I tried installing the whole trans & t-case assembly over the weekend and discovered some more interference between the t-case and the body. Specifically to a stiffening crossmember underneath the cab. Notched it out & plated back in. Plz disregard my bad-ground booger tack up there. Will test fit again & then weld it out.
Also decided that I really should make new engine-side motor mounts to lift the engine another 1/2" & fwd a 1/2" to buy some more clearance between the crank pulley and the steering crossmember to allow for sag over time & engine torque motion. Bummer, but makes sense.
8gvcpRX.jpg
 
12/8/2020
few hangups lately but still trying to make progress.
Decided that under engine torque motion & eventual bushing sag that the crank pulley was too close to the crossmember. So made new block-side motor mounts to give it a lift.
looks a lot better now. intake manifold still has plenty of room to the hood line. Pushed the thing as fwd as I could to buy clearance to the firewall but there wasn't hardly any space available before the tab wants to be over the bolt holes. if you go past that, the steering crossmember swinger bolt hits the block. so this is where it has to be.
KeVm4fm.jpg

z4VMZ8H.jpg


Impacts were obviously space around the t-case & the transmission. Not sure if i ever posted the cut for the transission. Will need to go clean it back up once I pull everything out again.
Also the nifty brace I made for t-case clearance needed to get cut out and moved almost all the way up to the floor.
Was able to get a trans crossmember started as well. Need more welding consumables to finish it. ran outta filler.
OJ3eGA9.jpg

LiFVUoB.jpg

zcUOyjd.jpg


Have to cut out that existing crossmember once I get the trans one welded for driveshaft clearance & also going to replace the body mounts while it's accessible. F'ers are pretty good and stuck though.
tacked up the radius arm mounts.
wKhK8Fd.jpg

0UrCEy6.jpg
 
1/15/2021:
A little behind on updates - been doing a lot of waiting on parts & covid-late deliveries.

Bought Kyle's dana44 knuckles that were tabbed for big wilwood brakes.
Had them sandblasted to finish a few inches of weld and discovered lots of micro cracks.
Ground out as much weld as I could & tried it again thanks to some help at a buddy's shop. Preheated to 500 in an oven and welded. I would chase with a map gas torch to try and keep the temps up.
Welds would crack if the temps would drop below ~400 to 450. Slow cooled by wrapping in a weld blanket & moving blanket. took us 3 nights.
Fingers crossed here.

New wilwood brake calipers, rotors, and pads with adapter brackets on the way, too.

I745INC.jpg

oDQr9xU.jpg

sji8Nog.jpg


Also got the intake manifold on, finally, with a 4-port steam vent kit. They just barely clear each other, but clearance is clearance, clarence.
qf5DdpA.jpg

M9bothX.jpg

4TyB5I5.jpg


Waiting on a pump from Howe & the ac system from vintage air to mock up the accessories and start working on the cage.
Going to mock up the knuckles & hubs & order custom axles, so then I can finish cycling the front suspension too.
 
1/19/2021:
Well the spindles fit right up, no problem.
but I did catch a rag on fire while cutting out the rusty floors with my plasma torch. That was exciting.

from this:
ahmkrrI.jpg


to this:
atiOJ6d.jpg

hrnQE7m.jpg

4878hEb.jpg


you'll notice that I probaby cut out more than was needed. If you take a look at where the forward cab mount steel is, you may notice there's a rearward slope to it. Well the factory floor angle slopes further rearward than the cab mounts for... some reason. The effect is that you lose some footwell volume, but it's not so noticable when you're high up on a bench seat.

It was a critical issue on my last truck with the low-mounted bucket seats. Driver fatigue over time due to bad leg angles.
The fix: make the "flat" section of the floor go all the way to the cab mount, and then turn upwards & follow the angle of the cab mount.
I needed to cut out the rusty stuff anyway.
The penalty will be exhaust pipe routing clearance. but that's a problem for later.
 
1/21/2021:
yeah this will be my first foray into large-size sheet metal panels. I'm nervous about it. Trying to give myself a chance with references though.

Finally received my brake components. I didn't have appropriate mounting hardware so I just had to kind of float everything together, but it was enough to get a first look & check that things will fit.
Need to get proper bolts & lug nuts to tighten up the calipers & rotor hats- it looks like the wheel offset may cause an issue with caliper clearance. meaning i'm worried the back side of the spokes on the wheel look like they want to hit the caliper. But I don't want to jump to conclusions until I get everything firmly tightened up.

wilwood Grand National 6 piston calipers, 14" GT37 rotors, willwood hats custom machined by Kyle & his fab guy, hubs with 5/8" studs.
61ZzNwS.jpg

FHVGtTu.jpg

pJn4jMz.jpg

ye5rVnV.jpg

1Xa4N6X.jpg


Also gave me the chance to get a rough first look at tire clearance to the firewall & track width.
Track looks pretty great but Yikes! @ the firewall.
Will need to triple check that I have the wheelbase correct & then cycle & turn but it doesn't look great.
TBD on solution. cut firewall or push beam forward, IDK what's better yet. Fiberglass & AC parts will help inform that decision.

c0T2Ml2.jpg

WBCEBzY.jpg


and yes, the jack stand is sketchy. I noticed after I took the picture & fixed it, thank you.
 
1/27/2021:
Ended up doing a parts swap straight-up with Kyle. my rotors & calipers for his. All the parts are brand new, which is rad, but I get the stuff that was used to setup this specific custom knuckle and he gets the new bits since he hasn't started the fab on his brake systems yet.
I actually have to go down there & get his rotors from him still.

In the meantime, still trying to make progress on the firewall cuts. This clears at full metal-to-metal & full turning range with tire hitting radius arm & frame with the wheel set at the stock wheelbase. Time to learn some sheet metal fab skills.

tmVAyoa.jpg

amQpt6b.jpg


reminder: this is what the firewall used to look like (except for the evap hole)
dm24Za4.jpg


TJlfIQh.jpg
 
2/9/2021:
Got the a/c kit from Vintage air. Evaporator mocked up into place on the inside of the firewall.
Removed the falling-apart rear interior panel thing, the windshield visors, windshield, and some other misc interior stuff.
The dash on these things actually just unbolts. Pretty rad.
Picked up a bunch of tubes & it's about time to start the cage.

eLzstXO.jpg

Hz6wCla.jpg
 
2/24/2021:
Roll cage has started.
Sleeves & non race-spec cage is saving my ass on this one. Lots of compound bends to follow these cab lines.
Also got the custom 14" rotors ordered up & fit. There's only a little clearance. Hope these wheels are rigid! anyway it gave me a chance to see the thing at full width for the first time, that was neat.

1zrRQRK.jpg

8FoaxAF.jpg

4g9o8PG.jpg


No Joe or Croteau cages here!
bkopcB4.jpg

46P8qIg.jpg

x3NEd9r.jpg


MkBJ8bh.jpg
 
and boom - there you have it.
I've since made a bit more progress on the cab cage. then i moved to san diego & remodeled my house.
I'll try to get this thing updated soon but it looks mostly the same, but rustier.
 
Glad to see you back on the forums and posting updates. Gonna be an awesome build and I will be going to mexico with you and my TTB F-250 prerunner as well. Good times are to be had.
 
hell yeah, bubba. You're gonna beat me there by a long ways though. i have a looooooooong way to go and i'm gonna be in florida until like... ~july based on how work's going at the moment.
 
Yeah was making great progress on it. Now it's all the small tedious shit that takes forever. Wiring, plumbing and more finish work.
 
Cut out the firewall. Folks were right, this is the right path. Less holes to patch and opens up way more options for how to properly brace up my cage. I was really struggling with finding a good solution to make a strong cage but retain the factory firewall. so... get rid of it.

I also added the first two tubes to start the floor tunnel.
 

Attachments

  • PXL_20220512_032722101.jpg
    PXL_20220512_032722101.jpg
    363.7 KB · Views: 14
  • PXL_20220512_032709654.jpg
    PXL_20220512_032709654.jpg
    412.2 KB · Views: 14
  • PXL_20220512_032656548.jpg
    PXL_20220512_032656548.jpg
    393.2 KB · Views: 15
Slowly.

I added these two tubes from the a-pillar out to the engine cage & located the first of the bushing interfaces for the engine cage.
Then added a straight crossmember between then only to realize that it really needs to have a kick in it to help with clearance to the intake & it's sensors. Also if it's higher I'll have a way easier time with installing & removing the engine. so i'll be re-doing that one.

JWcuVYf.jpg

OM6VBN6.jpg

rghHhX6.jpg
 
He's in Ramona. Also I understand the point of bushings for the cage BUT when going to this extreme why not just do it solid mounted like a normal roll cage is done.
 
Also I understand the point of bushings for the cage BUT when going to this extreme why not just do it solid mounted like a normal roll cage is done.

I'm trying to solve one of the main complaints from the last truck. It was pretty much undriveable without headseats.
part of that was poor cab sealing & insulation but, in my opinion, another signficant contributor was the fully hard mounted cage & cab system. even small rocks kicking up off the floor would ring super loud in the cab.

So yes, I'm definitely building something pretty capable but the goal here is not for this truck to be a "full sender."
This truck is meant for Baja miles & exploring at pace. I won't be participating in things like huckfest or races and things like that.
 
I get that. And you didn't have bypasses on that truck either. My Tacoma was caged and everything tied together with 3.0 bypasses and urethane motor and trans mounts. Factory headliner with dynamat under it and dynamat under factory carpet reinstalled helped I'm sure. Plus not a v8 with loud exhaust too helps.
 
Back
Top