You are using an out of date browser. It may not display this or other websites correctly.
You should upgrade or use an alternative browser.
You should upgrade or use an alternative browser.
Sequoia Family Crawler
- Thread starter Motiracer38
- Start date
Motiracer38
Well-known member
- Joined
- Apr 27, 2022
- Messages
- 499
Gee, thanks for rubbing it in. Progress has been slow with end of school year commitments but I did get a couple things done as long as a bunch of shopping.
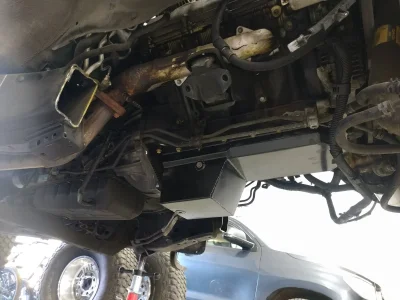
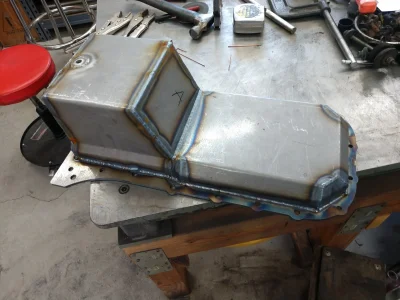
In my quest for up travel the oil pan was for sure in the way. I bought a ring on eBay and built a rear sump low profile pan. Still have to build a pickup and windage tray but picked up a ton of clearance. TIG welded the whole thing to minimize leaks and coated in a couple heavy coats of enamel inside and out. Deleted the dip stick and went with a threaded bolt on the side to set oil level.
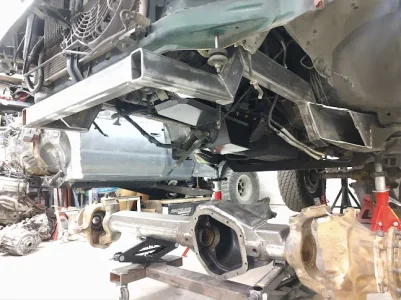
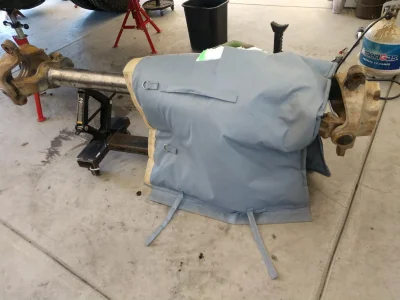
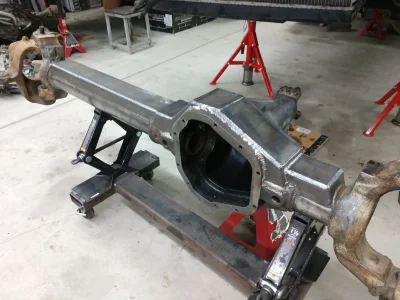
I also got the front axle truss complete. I could not find a truss with low enough profile to miss the oil pan and was also sealed from trapping mud and dirt inside. I welded 1/4" cold rolled steel to the center chuck using ni55 mig wire, preheated to 350 and cooled in a blanket overnight. The rest is 1/4" cold rolled welded to the tubes with an internal rib, designed as a bump strike on the last 3" or so. Truss is rolled 3deg back to pitch the pinion up and set the caster at 6deg.
Transfercase plans changed a bit with ordering a doubler plate that will use the front half of an NP231 and bolt an entire NP242 behind it. This gives me 4wd with an open center diff for snowy street driving and double low range to make up for not gearing the axles for now. It also helps balance the lengths of the driveshafts to closer match the link lengths.
In my quest for up travel the oil pan was for sure in the way. I bought a ring on eBay and built a rear sump low profile pan. Still have to build a pickup and windage tray but picked up a ton of clearance. TIG welded the whole thing to minimize leaks and coated in a couple heavy coats of enamel inside and out. Deleted the dip stick and went with a threaded bolt on the side to set oil level.

I also got the front axle truss complete. I could not find a truss with low enough profile to miss the oil pan and was also sealed from trapping mud and dirt inside. I welded 1/4" cold rolled steel to the center chuck using ni55 mig wire, preheated to 350 and cooled in a blanket overnight. The rest is 1/4" cold rolled welded to the tubes with an internal rib, designed as a bump strike on the last 3" or so. Truss is rolled 3deg back to pitch the pinion up and set the caster at 6deg.


Transfercase plans changed a bit with ordering a doubler plate that will use the front half of an NP231 and bolt an entire NP242 behind it. This gives me 4wd with an open center diff for snowy street driving and double low range to make up for not gearing the axles for now. It also helps balance the lengths of the driveshafts to closer match the link lengths.
Motiracer38
Well-known member
- Joined
- Apr 27, 2022
- Messages
- 499
the bodj
Well-known member
Oil pan is done, plenty of added clearance
View attachment 24980
How flat were you able to get it?
84projectFORD
Well-known member
- Joined
- Apr 1, 2022
- Messages
- 339
Made damn sure that paint won’t peel off. That would suck ass to have to peel off and plug the pickup.
Looks bad ass though as usual, Brian!
Looks bad ass though as usual, Brian!
Motiracer38
Well-known member
- Joined
- Apr 27, 2022
- Messages
- 499
Dunno, 8in or so after moving the sump? It's now 1.75 off the motor block. The motor itself is moved up about 2in at the axle as well for all the up travel clearance.How flat were you able to get it?
@85Yota I still have your SC400 oil pan at my house you brain damaged oaf. It did save me some money by ruling out buying one off eBay to use.
the bodj
Well-known member
No I meant how flat were you able to get the pan sealing surface
Motiracer38
Well-known member
- Joined
- Apr 27, 2022
- Messages
- 499
Oh, not very haha. It puckered pretty good around the ring but clamping to the table held the shape across the corners. RTV squeezed out all around so it should be good.
Motiracer38
Well-known member
- Joined
- Apr 27, 2022
- Messages
- 499
Motiracer38
Well-known member
- Joined
- Apr 27, 2022
- Messages
- 499
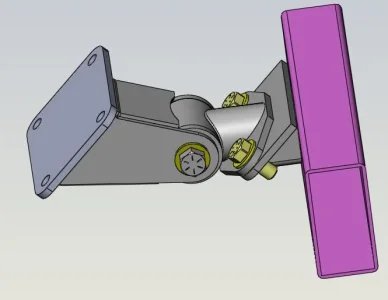
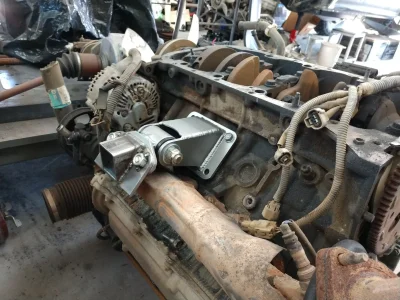
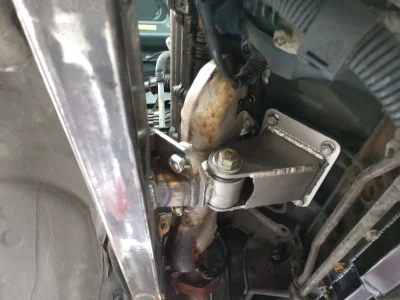
Progress continues with motor mounts. Built up on a spare motor using a polyurethane bushing and the Toyota style bolted plate to be able to slide the motor forward and out. Designed in CAD to hug the stock manifolds and keep ample room underneath for the upper link. All cut by hand on a bandsaw, coated with Seymour butts, and got the motor mounted solid.


the bodj
Well-known member
Why tack the nut from the bottom side? Are you able to remove the bolt without hitting the manifold?
smokeysevin
Active member
- Joined
- Mar 7, 2023
- Messages
- 240
I'd throw headers on it now and be done with it. The stock manifolds are garbo.
Sean
Sean
Motiracer38
Well-known member
- Joined
- Apr 27, 2022
- Messages
- 499
The nut is tacked because Toyota did it that way and I'm getting sick of holding two wrenches at a time when it's not really needed. They'll be easy enough to replace if they strip when I form a new hobby of pulling motors weekly. The picture is a bit deceiving, there is quite a bit of clearance and I do wish it was tighter but wanted to maintain a bit of an air gap between the poly bushing and the hot manifold. I could probably remove the manifold as it is now.
I have ebay headers sitting on the shelf and was probably going to end up mocking them up. They present some steering shaft challenges but nothing like a little more scope creep.
I have ebay headers sitting on the shelf and was probably going to end up mocking them up. They present some steering shaft challenges but nothing like a little more scope creep.
the bodj
Well-known member
I was more so saying to tack the nut on top and have bolt drop out the bottom for easier access
Motiracer38
Well-known member
- Joined
- Apr 27, 2022
- Messages
- 499
Ah, the bolt should always be pointed down when possible so that if it loosens up gravity won't help it back out. Especially important near high vibration areas it will buy you a bit of time to tighten it back up if it is found before it falls out.
the bodj
Well-known member
Stover nuts, my guy.Ah, the bolt should always be pointed down when possible so that if it loosens up gravity won't help it back out. Especially important near high vibration areas it will buy you a bit of time to tighten it back up if it is found before it falls out.
Similar threads
- Replies
- 10
- Views
- 246

