Ford Ranger 4x4 Prelander Build

theycallmeWALLY

Administrator
Joined
Mar 30, 2022
Messages
1,360
Where it all began Back in 2011. She was 'done'. A do all truck that needed NOTHING. I wasn't going to go full kill, I didn't need it... I just wanted to drive something 'built' and have fun.

IMG_0276.JPG

Keep watching.

I did stay true to the part about Driving something built and having fun, but things always escalate. And this truck has been a rad adventure mobile and taken me to some fun places along the way.
 
First item was a bed cage I found for sale on DR. It was a bolt in bed cage so I drove up and put the bedcage where she was going to live and drove home. Bought a set of 16" FOA bypasses from my buddy Tyler at TNT Fab and race truck!

Bed Cage.JPG

:: Fun Fact :: 10 years later that used Optima Battery finally died on me.

Time's were much more simple back then and Cal City Weekends were life.

Loaded Bedcage.jpg
 
I wanted to 'adventure' more so I went out of my comfort zone a little bit and went to a 4x4 Meet Up in Gorman.

Mandatory Flex

Posted up in Gorman.PNG

I then wanted to start cleaning the truck up as best I could with my limited budget

Sway Away Shocks.PNG

Built some stuff that I'd quickly replace when I had some extra cash.

Rubber Bump Stop mount since it didn't come with a bump stop.

1648683612161.png

Deaver G50s because race truck (just go Giant 64 if you're going to keep it leaf sprung)

1648683738449.png

Organized some Storage

1648684135734.png

Kept on Trucking...
 
Finally came across another big upgrade! 4.5" over D35 beams.

(I'm still running these beams and Radius arms today)

1648684301229.png

And then I got over the two tone and painted the GREEN

1648684839809.png

Then I found a cage that was prebent and tacked together... $700

1648685036705.png

And my epic work space to cage the truck was HUGE.

This is how the garage was packed up every night after I was done working on it.

1648685187240.png

And a couple of weeks later she was caged.

1648685369746.png

1648685396795.png
 

Attachments

  • 1648684276165.png
    1648684276165.png
    808 KB · Views: 0
The truck was getting close to her first trip which was out in Pismo. Ran great and felt so much more rigid and solid with the cage. I also felt way more confident driving it knowing how much safer everything was.

Then DMC boys started putting together a big trip (the Grand Canyon Trip) and I needed to tackle some safety items for the trip.

DMC Grand Canyon Trip Report - https://badlinesgoodtimes.xenforo.cloud/threads/dmc-grand-canyon-2013.20/

First up was a dust light.

1649258450792.png

Then I needed some additional light up front. So I stole the China light off daily and welded up some quick mounts.

1649258488637.png

1649258559880.png

The Trip was great. Read here for more info: ( https://badlinesgoodtimes.xenforo.cloud/threads/dmc-grand-canyon-2013.20/ )

1649258292846.png

I started having some issues on the very end of the trip. Didn't know it at the time but the fuel pump was going out. I'm pretty sure the Gas tank needed a good cleaning which I never did. I've gone through like 4 fuel pumps in the truck. But I'm in the middle of a rebuild now and going with a Harmon Fuel Cell.

Chase 1 to the rescue

1649258704057.png

Got the fuel pumped fixed and made another trip out to the desert.

1649258810222.png

Then I wanted to rebuild the rear bumper so I could have a double stack. Only having one spare tire is for the birds... I don't want to have to constantly worry if I get one flat on a trip and I also tend to do solo trips when no one can go with me.

1649258931242.png


Boxing in the rear frame.

1649258976118.png

Action Plan

1649258997439.png

During this process I got in touch with my good buddies Mikey and Jesse and they had some time on the weekend to help me get my Giant 64 kit installed.... To be continued
 

Attachments

  • 1649258384938.png
    1649258384938.png
    836.2 KB · Views: 0
Jesse I believe under the truck putting in work on the Giant 64 Kit install. It's crazy how fast this can be done with a few dudes helping. I pretty much always work on my truck alone. I think this is one of the few (literal handful) times I had physical help on the truck.

1649259199538.png

1649259310040.png

69" of pure joy

1649259336994.png

1649259362094.png

1649259396389.png

Then I had to tear it all apart again to cycle the leaf pack for the shock taps.

1649259464375.png

1649259486627.png

1649259510514.png

And while the welder was out it was time to finish up the rear of the bed cage. The whole bed cage bolts on and off. It's still exactly like how it was build here today.

1649259581561.png

1649259616465.png
 
Shocks mounted and strapped

1649265163989.png

First real trip with the new rear set up. We went down to glamis. The rear end was howling but made it back home.

1649265298370.png

Bottom of Olds

1649265322810.png

Top of Olds

1649265367591.png

And some dirt on the way home.

1649265410181.png

1649265437632.png

After said trip the truck needed a little prep..

1649265553025.png

While everything was off I added a little bit of weld to these retaining washers between the locking nuts for the nubs. It helped them not be so loose going on and now it can't slide over the threads like it has done in the past. This is a fancy tip for anyone not wanting to spend the money on the lock style washers. It really helped keep the bearings tight.

1649265577157.png

and it was time for new gears since they were howling.

1649265655301.png

1649265677025.png
 
I had some cracking on the rear bed cage because of where the tubes landed vs where the shocks did after adding the Giant 64 kit. Made a big gusset and it helped keep everything together for the most part.

1649265925558.png

And then a few more trips

1649266003816.png

1649266022622.png

and shortly after finishing college and starting up my job at Method Race Wheels i got my first set of 'real' wheels.

1649266111931.png

It seems as though I was constantly upgrading the truck at this point but I'm skipping through a lot of months of BS and daily driving the beast.

Manual Transfer Case for the win

1649266222142.png
 
Last edited:
After this purchase I had taken the truck on a work trip out to Sedona for an Toyota FJ Event.

Yes I brought a turd to a turd fight.

The region is gorgeous and I'd recommend any and all to go out there to enjoy all it has to offer.

Screen Shot 2022-04-13 at 8.44.34 PM.png

This was about where the truck started having a few issues. We were on the Broken arrow trail in Sedona at the top of the stair case and it started sputtering and misfiring. I took the wheel from the wifey to try and figure it all out and I could get it to run good and strong if I just didn't let it idle for too long.

Screen Shot 2022-04-13 at 8.47.04 PM.png

That was the last leg of the journey for the offroad stuff and I was able to drive it about another 40 miles or so under its own power. It was running like shit and had no top end power. I had to climb a 6% grade for about 20 miles or so and it made it up but I was only able to do about 40 considering the loss of top end power. Once she finally died and said no more I pulled out all of the Air/fuel sensors and gave them a good cleaning with MAF cleaner. Checked all of the spark plug wires with a spare, and looked for any random issues such as an unplugged vacuum line or anything at this point. After 45 min of sitting on the side of the road we pulled out the umbilical cord and got towed back to camp which was 19 miles away.... We were flying on the road though at about 50, and the truck would run good enough where I was about to keep turning it back on and use the power brakes. Most of it was slightly up hill which made being on the strap a lot easier.

Screen Shot 2022-04-13 at 8.48.06 PM.png

This would be a common theme for this truck... Bad fuel pumps. I may also have had an old dirty gas tank as well burning out pumps. This will not be an issue in the future.
 
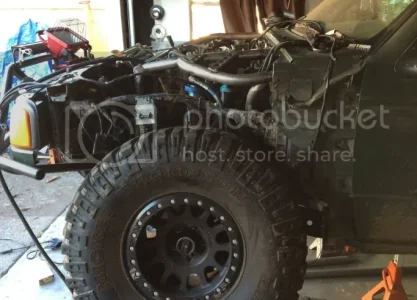
Super busy with work and working events on the weekends but the shocks have me motivated. Got the fenders off, inner feder wells out, the hood off, and 3/4 of the old engine cage off. It was 90% bolted on and a few small welds. The welds were easy the bolts were a pain in the ass... They are inside the frame where it is boxed and have been there since 1999 I believe.

I have a full day today to work on it so I should have the rest of the cage off and the frame cleaned up where the cage will mount. hopefully I can start laying down the base of the engine cage frame as well.

Screen Shot 2022-04-13 at 8.57.49 PM.png

Going to use this thick piece of metal to attach the cab to the front with some square tubing.

Screen Shot 2022-04-13 at 8.59.26 PM.png

Got the the engine cage 100% off. Whatever bolts I could I just cut off and the rest were a huge pain in the ass. I have all the wiring organized and labeled and I even got 1 tube cut and bent up yesterday!

Screen Shot 2022-04-13 at 9.00.31 PM.png

So far this is my plan for the cage... I haven't had a chance to check all the clearances with the intake. I may just have to shorten it a little as the old cage was fairly close to the same spot. Let me know if there is any reason I should run it like this please. And just an FYI this front cross brace will have tube clamps.

Screen Shot 2022-04-13 at 9.02.42 PM.png

Pictures of said tube from above and then some of last nights progress... One tube at a time.

Fits in there nice and snug. Hopefully I can get a different Intake at some point, but in the mean time this will work.

Screen Shot 2022-04-13 at 9.04.32 PM.png

More tubes

Screen Shot 2022-04-13 at 9.05.38 PM.png

Soon became time to start organizing shock placement before burning all of the tubes in.

Decided it would best to run the bypass in the rear on my truck. Where I stubbed out when I built the cap cage and keeping all of the AC and heating components led me towards the decision. All that said, the coilovers would have been too tight of a squeeze to fit in.

Added a support tube. Since the photo It has been moved 1/4" more forward for clearance reasons.

Screen Shot 2022-04-13 at 9.09.54 PM.png

Lots of time with an angle grinder can get you some nice results.

Screen Shot 2022-04-13 at 9.16.17 PM.png

I was waiting on coilovers to be built and with a little research found out that the 12" bypasses I had were going to be the same length. So they were used as mock ups

Screen Shot 2022-04-13 at 9.18.40 PM.png

I made my template for the lower front coilover mount last night and cycled it. Pretty much what I expected and with out I have it laid in closer to the frame it should work out just fine with a 12" coilover. The only issue I found is that at full bump or full droop (which ever I decided to forfeit) the coilover does not cycle 'clean'. It starts to go into a regressive stroke, but only slightly. I'm not to worried about it because the bypass cycles smooth and that is where most of the valving will be. Please comment now with why I should care about this.

Then I cut this plate out as a mock up.

Screen Shot 2022-04-13 at 9.20.03 PM.png

The bypass looses almost 3/4" of shaft travel which 5/8" is limited at bump and an 1/8" at bump so I don't blow the bitch up, but everything cycles smooth and is in line with each other and it cycles 17" of travel at the end of the hub which means I can be strapped at 16" easily and be plenty happy enough.
 
The fun part after cycling was done. Weld her up and then hope everything is in the right spot

Screen Shot 2022-04-13 at 9.25.13 PM.png

Got it back on its own weight. I needed to check to make sure I didn't new a new set of springs due to the change in shock angle. After bouncing the truck up and down it seems to sit better then it did before with less preload on the main spring. I also mounted the resivour tabs for to mount the resi's but thats about all. I also cut off the A piller tube where it met at the frame because of previous cracking issues when the front wasn't tied into the cab cage. I cut it was a saws all right against the frame and then I cut it off just past the weld, slid a piece of 3/8" plate in there and with the help of my jack I was able to get it close enough to weld. Going to do the same thing to the other side as well. Then I stood there looking at it for about an hour after that thinking about whoops when I could have been getting stuff done...

Screen Shot 2022-04-13 at 9.27.12 PM.png
 

Attachments

  • Screen Shot 2022-04-13 at 9.25.13 PM.png
    Screen Shot 2022-04-13 at 9.25.13 PM.png
    569 KB · Views: 0
I was planning on just using poly bump stops but then I figured with the amount of work it was going to take to get them on I may as well use Hydraulic ones. Got these bad boys delivered to my desk today thanks to Brian and Mark over at King! Went a little over kill and got the 2.5" shorty's with a 2.5" stroke. the next 24 hours are going to be busy but I'm hoping I can get the truck out of the garage and into the dirt.

1650422407239.png

Bumps were in so I needed to start by making a bump stop on the beam in order to figure out proper fitment for the Bumps themselves.

1650422564115.png

Everything was now bumped and strapted at 17.5" of travel

1650422638891.png
1650422677716.png

Mostly everything was done and welded at this point so painting was next.

1650422802787.png

Had to do a junk yard run to pick up a new master cylinder reservoir. Some info on this swap:

- Swapped original Master cylinder with 1987 ford ranger master. It is the same master cylinder from around the same year f250's.
- The master cylinder does not come with a reservoir so I just went to the junk yard and picked one up. The junk yards take the caps off of these to drain and do not replace them. currently I'm using the same cap from the original one but it does not fit perfect but it does work.
-Also needed from the junk yard was the fitting for the rear port. Not sure what it does or why it was needed but I also picked that up from the junk yard because it was not provided with the new master.
- it needs a 5/16 to 3/8" adaptor for the front flange. I picked up a pack of new ones from autozone for $5 but this is something else you can just pick up from the junk yard while you are - getting the other part.
- The f250/old ranger reservoir even has the same plug to sense weather the brake reservoir is low on fluid.

Made some new brake lines and it seems to be good to go!

1650422840397.png

I ended up running new brake lines to the front only. I just bent the line that is used for the rear for now. I'll redo it, but I just want to get the truck out in the dirt for a shake down.

1650422871076.png

After a shit ton of zip ties to hold everything in place she was able to make her first appearance out of the garage. The height on the front end looks good so it doesn't seem like I have to change my spring rate again and nothing fell off. I'm hoping to have all the little stuff buttoned up on Tuesday night and drive it to work on Wednesday and hopefully have a good weekend in glamis with the truck over new years.
1650422917148.png
 
GOOD NEWS! The stuff I did on the truck worked out great. No issues with the new engine cage set up and shocks and it worked pretty bitchen right out of the box!

BAD NEWS!!! I blew third gear after only driving the truck 4 miles in Glamis!

Got it ready to give a test drive to work and back in the morning. Its 7 miles each way so that means it could easily do 300 each way right?

After the test drive to work it was time to hit the road.

The first night was a success in the new to us Pop-up Camper in the back of our Nissan Titan! The camper was awesome and super warm with it's little heater and car battery running it. We drover separately since we didn't have a trailer and wanted to use our new camper. The Ranger made it down to Ocotillo for the first night to meet up with a co worker and see what this side by side thing was all about.
1650423202932.png

1650423224737.png

The next day we made it out to Glamis! Again no issues with the truck. I unloaded it and took it out to Oldsmobile to meet up with the rest of the DMC. Drove it back to camp and I was eager to take it out on a test run again. Everyone was drinking and no one really wanted to head out but I was itching to drive the truck. Talked Jonny into going, and on the way back from olds I blew third gear in the trans because I was driving like a dumb ass.

Chase 1-AAA had our back.
1650423255908.png

Having the premium membership gives my wife and I a 200 mile tow. I used hers of course and I was able to get it towed from the flats in Glamis to Lake Elsinore where it currently sits at a friends house. Going to use a 100 mile tow today to bring her the rest of way home and search for a new trans.

1650423331022.png

Plan of action:
Take the bedcage and bed off
Tear down leaf pack
Cycle/mount 3.0 Shocks
Mount new bed/bedsides
Truss rear end
Redo the brake lines with hard lines
Drive fast
 
The truck progress has been slow due to a busy work schedule but I decided to quit being lazy and get my ass back in the garage.

Pretty stoked to see how it will look with the new to me manual transfer case. I got it adjusted last night to where I think it should.

1650423609357.png

Finally got the truck out into the dirt to see how well the front end worked, having only 10 min of drive time in glamis just wasn't enough haha. The front end did great with only a few minor issues.

Pre trip Prep: C clips holding in the uniball's on the beams popped out after glamis and the race radio needed to be hooked back up.

1650423723028.png

Started the trip off with Metcho finally ready to take his insanely awesome Taco out for the first time. I figured I would button up the truck enough to take it out for a day trip with him. It was a testing the waters day for both of us. I gave my dad a call and asked if he wanted to see what all this truck business was about. He said yes and we all met up in Rosamond for a long day in the dirt. Woke up at 5:30am Saturday morning and headed out.

Truck felt like poo driving up there. It had a weird vibration turning slightly to the right, super loud with the front bypasses, and just not the Subaru STI I'm used to driving. When I got there I pulled into the Mcdonalds parking lot to meet my pops. We had breakfast and waited for Metcho and Jonny to show up. I called out on the radio and they answered 33 miles away from Acton. Pretty amazing how well mine/there radio works. We typically run the weatherman station for anyone wondering. At that point I figured I'd do a once over on the truck and found out that the passenger side wheel bearing as a little loose (the cause of the vibration). In the parking lot I pulled it all apart, tightened it up and we were good to go. Metcho and Jonny showed up 5 min after I was done. We then gassed up, aired down and were ready to hit the dirt.

My dad held in tight and was super nervous for the first 30 min. He had never done anything like this. The first 10 min of dirt had it all too; jumps, rollers, whoops and a few blind corners.

After the first 40 miles of the trip we stopped for a mini break. I looked under the truck and one of the stupid C clips was out again. I figured it had last 40 miles or so and the bolt was holding everything in so we pressed on to the abandoned prison where I could work on the truck on a cement pad in a shaded garage.

1650423756683.png

After borrowing much needed tools from Jonny and Metcho I told them to go explore and have fun while I worked on the truck. Got it buttoned up in about 30-45 min after filing down the C clip a little bit and reinstalling it and we were ready to press on and get lunch. We were running a little late due to my truck being down for a little bit so we hit the 395 north for about 10 miles and drove the dirt the rest of the way into Randsburg.

1650423780905.png

Notice the sweet wheel chalk.

Lunch was awesome. The place was packed, the burgers were good, the beer was cold and the bar keeps were rude.

We were there for a good hour and then pressed on back out towards cadillac road and back to Randsburg.

1650423829683.png
 
Sold a ton of shiz at the swap meet and turned all that money I made into making my wife happy by giving her half and purchasing headsets and an intercom from PCI at the event. It was raining a ton so put off picking them up there and I just went on Monday to there HQ and picked them up there. Super excited to get them installed before the next trip but I still have a good amount of work ahead of me.

After the cal city run I pulled the truck back into the garage to start on the rear.

1650423892667.png

Completely bolt on bed cage for the win!

1650423919740.png

Cleaning time!

1650423944405.png

Before cutting it apart... remember to level it out

1650424008709.png

Snip Snip

1650424036539.png
1650424052047.png

Mock up where the hangers should actually be... IMOP the G64 kit should have the rear hangers pushed really far back. Like the brack should be vastly different. See below. ( 2022 update - I can attest that the kit has been on my truck for 6 years and never been worked on by Deaver. I believe the pictures below are the most correct way to set up the kit for popper fitment )

1650424130078.png

Plate work - not sure how I'm going to tie it all in. I'm a little worried about how many different welds there will be. The plan so far is to plate the outside of the frame and then have that wrap around to cap off the square tubing. The inside of the frame is kind of a conundrum because I don't think it needs to be boxed right at the end but also seems unfinished to me. If I did box it in it will be a pain to bolt/unbolt the shackle hangers. Any suggestions welcome.

1650424296646.png

I was going to hurry up and get the truck done quick for the next trip out but I decided to hold off on a speedy rebuild due to work getting in the way and just trying to enjoy working on it.

I was really unhappy with how the sketchy vice/grinder/hammer bends were coming out when I was trying to clean up the rear end of my truck so I spent the weekend making a press brake. $50 bucks from the REM pile at the local Metal supply and I'm super happy with out it came out.

1/2" base plate

1650424357567.png

Solid stock as guides.

1650424394801.png

Angle iron to create 90* - Simple yet effective.

1650424446540.png

And now I can bend thick plate properly and to form! It doesn't seem like that big of a deal but if you know, you know.

1650424506896.png

1650424583903.png

1650424598475.png

Added a little bend to the frame to match the rear square tubing size. With that said I then needed to adjust the Giant 64 kits rear hangers.

1650424690427.png
 
Flaunt came over and gave me a hand with some heavy lifting. I got the bed back on the truck as well as the bedcage so I could cycle everything properly. A lot of cutting and grinding and I got the upper and lower shock mounts off and ready to start the cycling process. Got the upper shock mount where it needs to be now I just have to get the bottom one going and ready to guess on the lower and cycle.

1650424819362.png

Some more pieces to the puzzle. Nothing to exciting because I have been taking my time building everything lately and it has been a lot more fun that way although it's a slow process.

Lower shock mounts -

1650424886245.png

Weld washers added

1650424899941.png

Where the new upper shock mounts are. Its a lot better then where I had them before and where I really wanted them but I was being lazy at first and didn't want to do all the extra work I ended up doing regardless.

1650424995665.png

And lower shock mounts

1650425039866.png

More welding needed to be done so you may as well do it all at the same time. Rear Axle truss was next.

It fit like shit for reference. It was a ruff stuff truss. I heard the tab zone makes a better fitting one.

1650425108363.png

Lots of marking, cutting, grinding, and test fitting to get it to a point where she was weldable.

To be continued.
 
Finally I was able to spend some time on the Turtle Truck.. Had a few drinks and said "fluck it." This lead to my decision to weld the truss on. I made a really ghetto little jig set up with jack stands, tubing, and my jack. I also left the axle and 3rd member in to act as a straight bar. Oil was also left in it as well with the breather tube open. Probably sounds sketch but whatever it wasn't. I welded it slowly and it never really got that hot. It would be like welding a tab onto the housing while the rear was still under the truck or adding spring perches like when I put the 64 kit on.

After 2 days it was done (ran out of welding gas). I let it cool for a couple of hours, then took it off my sketchy jig and it seems fine. Each axle spins easily by hand on both sides. If I start going through rear axle bearing's I'll know I have warped it.

Today I'm going to work on getting brake lines ran across the truss. No more sketchy soft lines. Here are some pictures of the progress:

1650425275849.png

1650425291697.png

1650425335945.png

And now to installing everything!

1650425366375.png

I find the next two pictures to be very important... It's the little things and I hate when I don't do this.

Top is fine but wear's out nut.
Middle is correct.
Bottom is what was provided... and wrong.

1650425427657.png

And how she looks installed.
No lathe needed. Just a sharpy, cut off wheel and a flap disk.

1650425501593.png

And after all of this - The truck is back on the road! Drove it around the block and it runs, drives and stops... Doesn't feel good but this truck compared to the STi is a big leap. I was able to get the rear shocks revalved. It had a 20 stack on comp and 12's on rebound, now it has 15 comp and 8's on rebound. Should be solid for what I need from the truck. I can't wait to get out there and beat on it. Hoping the truck lasts all weekend. I haven't driven it in so long I have no trust in it anymore.
 
She's a lot of fun to drive at this point in her life.

1650425672153.png

And then reality hits that you forgot to torque your lug nuts...

1650425709313.png

1650425723189.png

Did some work on her this weekend. Got the hood trimmed up and mounted. I still need 2 more hood pins because the two corners closest to the windshield are bubbled up. I've never mounted a hood before so I'm not sure if I did anything wrong but whatever. Hopefully I'll have it fixed here in a day or two. I also found a local Napa location that mixes paint so I should be able to have it painted by next weekend.

1650425760909.png

Got the GPS mounted

1650425778069.png

Added a power Tank

1650425809871.png
 
Slow and steady:

Time to get all the accessories wired up and a few things mounted. Started with moving the radio and mounting the PCI intercom. Thanks to Alon who gave me a mounting plate made for RZR's but with a little trimming it made a nice little face plate for both the radio and intercom.

I have it mounted in the center console under the arm rest. Good for my set up because of the dogs. They like to step on everyting and break stuff... we'll see how well it works. I may need to remount where the wiring for the headsets plug in because they may not fit under the arm rest. Future issues with this I'm sure... haha

1650425874691.png

1650425885789.png

1650425900674.png
 
Back
Top