1999 Toyota 4Runner Project “RADRUNNER”

KingJew_1902

Member
Joined
Feb 2, 2023
Messages
22
Figured id post up my project.

I originally had planned on getting a sandrail but we don't have storage for an open car and we needed a 5 seater to fit my 3 kids.

My wife always had a liking for 4runners and Im a ford guy but I knew toyota had a decent record in the offroad scene. So we agreed to build a 4runner for Ocotillo wells.

I park it in my driveway which solved the storage problem and the wife was happy so it all worked out.

Dec 2020 I picked up a 1999 Toyota 4Runner SR5 3.4 V6 4X4 for $4600
2BFCF3F8-EAA8-4D0D-A9AF-B8132A1A2655.jpeg

Literally as soon as we got it home, it started blowing white smoke. It sucked but I saw it as an opportunity to rebuild the entire engine and have a fresh start for future trips.

I had a local engine shop Eagle Eye Engine Rebulders who were referred to me by a few people do the overhaul.
32E8C22A-5858-47E0-9688-9FAF2C262187.jpeg

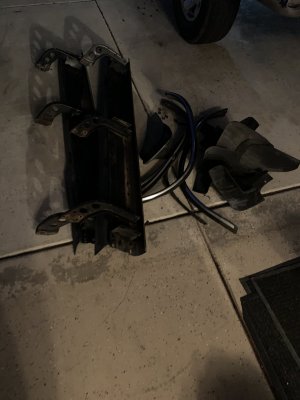
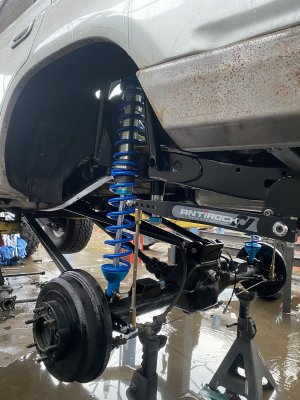
Once the rebuild was completed I got her back home and started tearing into her. Pulled the fender trim, hitch spare tire, side steps, mud flaps etc
2656E1E6-2853-429C-8F11-A28AC2707D36.jpeg
 

Attachments

  • C173FD50-6761-48E7-8B75-736DC294F515.jpeg
    C173FD50-6761-48E7-8B75-736DC294F515.jpeg
    203.9 KB · Views: 1
Last edited:
I started researching parts and LT kits and started spending money.

Parts list:
New motor mounts
New OEM steering rack
New OEM lower ball joints
New radiator and hoses
New starter
New battery
New OEM knock sensors
New catalytic converter
New O2 sensors
New front rotors and pads
New Brake booster
Extended brake
McNeil Racing +4” fiberglass front fenders
5 New Falken at3w tires 315/75R16
4 Pro comp wheels 16x8 (used)
1 New Pro comp Spare wheel
BTF +4.5” long travel kit
King 2.5x8” C/O’s w/ adjusters thru BTF
4 King 2x2 bumpstops
King 2.5x12” C/O’s
Total Chaos Splindle gussets
Total Chaos double shear gussets
Eimkeith shock tower reinforcement
333 fab cam eliminators
Scarab offroad washer fluid tank relocation kit
F150 gas tank
Nguyen works rear bumper
Yukon 4.88 gears
Limit straps
Anti-Rock rear sway bar

And then waited impatiently for multiple weeks for parts to arrive.

When they did arrive it was like Christmas.

22AE3AF8-3098-4104-B6C7-5098FC336554.jpeg
5A5A44A9-877B-45FB-ADEA-6B442A037721.jpeg
DDBF32AC-6C1C-42AC-8A43-338F47A5BFF1.jpeg
6F1C52E8-428A-4E76-A6B7-FE8855733270.jpeg
F6B45D1F-88CD-4F5A-98DA-CC200356F6E6.jpeg
E77C5257-661B-4F3B-A05A-11DDD0950835.jpeg

Now the fun begins
 
Update 12/6

So once parts were in hand in was time for hovercraft mode
70E61FEC-9586-4928-A6EE-4B660B889DCB.jpeg

Didnt get many photos but the assembly of the front kit went smooth.
60D25325-8485-416B-B8EF-E1E19DCE15BE.jpeg
4003D83A-4C4E-4076-9AED-413B057B358E.jpeg
8953C963-705D-40E1-BB65-FFD617CCD95B.jpeg

Once the front was assembled. I scheduled an appt with westfab for the front bumper.

8DB2EE2E-C4B2-4DAA-81C3-68B5CA90CB5F.jpeg
Its not perfect but it serves its purpose
 
Last edited:
Dude yes! It's so nice having a build and starting with all the parts. It makes building go so much faster and smoother.
 
I initially went with old man emu rear springs and Rancho shocks to at least get the tires on and driving but once Brandon at Arcadia Offroad had an opening I jumped at the chance to start the shortcourse style 4 link
71B3CF48-DC36-4601-92B5-9AE24E338E37.jpeg
He got it on a lift and tore it apart. Got rid of the oe gas tank, oe suspension, mounts and started fabbing a kit
8F7AECFB-5593-4730-94EA-819931B75C1C.jpeg
8CA9E23E-2722-4D70-B748-8FA196418209.jpeg
C2147859-3AE5-48E4-A7FA-1E2524E2B964.jpeg
Fit and plumbed the F150 tank
812DCDFA-AC09-4FD6-BB4B-8F75F56B7C9B.jpeg
Cut thru the wheel wells and built shock hoops up into the cab
079CC91F-DD72-4652-B26B-461C5E7CECE1.jpeg
274DBA8D-7CBE-4250-94F1-B2E2F4734439.jpeg
 

Attachments

  • EA77D484-2FDA-4003-AE2C-3040AD218DF1.jpeg
    EA77D484-2FDA-4003-AE2C-3040AD218DF1.jpeg
    376.7 KB · Views: 8
  • 53BC3721-D521-40E2-A7D4-57A43EB85781.jpeg
    53BC3721-D521-40E2-A7D4-57A43EB85781.jpeg
    376.7 KB · Views: 8
Continued

CE374D76-13E6-4C5D-8AB5-2D18DBCA3A85.jpeg
Used the oe rear end to keep my speedo, and parking brake. It also kept the cost down.
6A7690E4-6973-4503-836C-03ECCD80834E.jpeg
FDF378F2-F5A4-4691-83FB-C389D966EFAA.jpeg
Also added a high clearance bumper from Nguyen Works

It was time to seal the cab as best as possible, so it was time for fiberglass
98E48F89-7AE5-4070-AA90-27645D25EF14.jpeg
B743E93B-4F9C-48CF-B997-E934AB504905.jpeg
AD3A5A40-9B21-4EC8-96CF-7EBE4114B1FD.jpeg
Once the 2 pc covers were finished I siliconed and riveted the lower covers into place and the top covers are pressure fit into place.
 
I reached out to Tanner at TKO and scheduled some fab time to weld the emkeith, total chaos reinforcements and mount the shock resi’s and bumpstops.3DC4589E-8F43-4C49-BA39-71CC252FD149.jpeg
7661D2AE-04A9-45EE-976B-B87363BB8755.jpeg
installed the new steering rack and had Precision alignment in Temecula perform the alignment.
 
Oct 2022 i had Dialed Shock Prep revalve, freshen up the suspension and rerouted the resi hoses in the rear for better flow.

I also added a spare, harbor freight jack with DMZ jack skid and small portable compressor all tucked between the seats and tire.
1EC100BF-B334-47EA-A874-2721E79134C2.jpeg

From Dec 2020 to Feb 2023 all these stages of the build were completed.

First real shake down trip was Thanksgiving 2023 in Ocotillo Wells.

I had some over heating issues that im currently in the process of fixing. Clutch fan went out on me.

If i wasnt to hard on the gas it didnt overheat so we took it fairly easy.
Heres a couple photos from camp.

7E99373C-5A55-45BC-95C5-BDE85E0D85D4.jpeg
C16CCBB5-9CA7-4C91-AF90-04CEFCD773C1.jpeg
025BBCC4-2852-4983-B357-D210C225AC35.jpeg
Overall the truck felt great. Next trip will be presidents in Feb. heating issue should be resolved.

Next step is roll cage, seats and harnesses.
 
How hard was it to get that f150 tank in there? I'm planning on a 3 link/panhard setup right now but I would for sure rather go 4 link if the f150 tank isn't too bad.
 
How hard was it to get that f150 tank in there? I'm planning on a 3 link/panhard setup right now but I would for sure rather go 4 link if the f150 tank isn't too bad.
Cut out the spare tire cross member. Build some mounts for the tank straps and it fits like a glove. The tank is only 19 ga capacity similar to oe cap. I would like to move to the jeepspeed fuel cell in the future for more capacity
 
Back
Top