Rez-Erected 94 4Runner

triple_fcked

Member
Joined
Feb 29, 2024
Messages
24
Location
Moreno Valley, CA
I figured I would start a thread to document the build so far. I didn’t start the build but I would say I’ve gotten it extremely dialed in from when I first got it.

Specs:
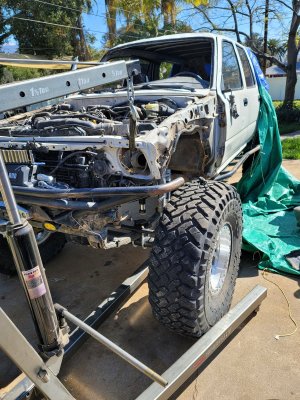
1994 Toyota 4Runner 22RE

RUF Springs Front, Chevy 63” Springs rear

Front Axle: +5 Rock Assault, 6 Shooters 30 spline OG Longfields, IFS hubs with tacoma brakes, 5.29 w/Detroit Locker

Rear Axle: IFS width; 5.29 w/ Grizzly Locker

Fox 2.0x12” RR Shocks
Locked 2.0x2.0” Front Air bumps

5 Speed, Dual cases 2.28x4.7

IMG_8288.jpegBought this beauty off facebook marketplace in November of ‘22.

I was putting around in an 80 series land cruiser but I caught the bug for The Hammers after a trip down there when I had to keep parking the land cruiser to ride along on “real trails”
1116.jpeg
My brother helped me drive it 9 hours from Northern California sight unseen. I was trailing with my daily filled with all of our spare parts and tools, but we actually had zero issues the whole way.
1000000058.jpeg
I didn’t know how to drive stick yet, so we parked it at a buddy’s property in Lucerne valley and I went back up there the next weekend to wheel it and learn how to work the stick, then had a trial by fire driving it home.
 
Last edited:
Initially after the roll I was gonna start all over, and just save the drivetrain, but as I started pushing the roof out and fixing the cosmetics, it started looking better and better.

So, I bought a bender, learned how to use bendtech, and got to work. I was only able to really work on it during the weekends, so it took me 9 Months to cage it start to finish, there were plenty of times where I wanted to just scrap the whole thing.
1000000580-jpeg.21545


1000001384.jpeg1000001190.jpegIMG_2597.jpegIMG_2596.jpeg1000001571.jpegIMG_2171.jpegIMG_2598.jpeg
 

Attachments

  • 1000000580.jpeg
    1000000580.jpeg
    567.1 KB · Views: 90
Last edited:
This thing got wrapped up right in time for New Years, and I’ve been having a blast driving it to and from the trail.
IMG_2575.jpegIMG_2346.jpegIMG_2412.png
Now that we’re all caught up to speed here’s the gig:

My latest trip out I peeled the differential out of the rear housing and broke a rear axle, damaging the housing beyond repair.

While I was building the cage, I picked up a set of Dodge Kingpin axles for a smoking deal, thinking I would build them in the far future, but 40’s on Yota axles lol. I don’t feel like throwing another Toyota axle underneath this thing so I have to build them sooner rather than later.


So this thread is to document the 1 Ton swap, and general build up of this clapped out pile. :)
 
So rad thanks for taking the time to make the build thread. I think I saw this thing @Tacodust 's Cougar Buttes trail run Vlog?

I have a rear housing with Axles sitting in my shed if you wanna slap it in and get this beast going again while you get other axles going

let me know!

Elliott
 
So rad thanks for taking the time to make the build thread. I think I saw this thing @Tacodust 's Cougar Buttes trail run Vlog?

I have a rear housing with Axles sitting in my shed if you wanna slap it in and get this beast going again while you get other axles going

let me know!

Elliott
Yep that’s the one! That was pre “Kickflip” lol.

I actually might take you up on that offer. I was taking stock today and my 1 ton parts pile isn’t quite as big as I thought it was
 
This weekend, instead of fixing what’s actually wrong with my 4Runner, I’ve knocked out a side project that’s been kicking around the shop for a while.

I got a very well enjoyed set of Total Chaos dogbone shackles from a customer’s truck, and instead of just throwing them away, I figured I would repair them for my truck.

IMG_2628.jpeg
All of the holes were egg shaped, but 1 of them in particular was so bad it was larger than the repair washer’s hole sizeIMG_2626.jpegA little chunk of copper and some quick mig filled this hole in.IMG_2629.jpegNext step was taking the shackles over to the mill and drilling the new sized holesIMG_2631.jpeg
Modifying the repair washers to be the correct thickness
IMG_2632.jpeg
This gave me a press fit insert into the shackleIMG_2633.jpegIMG_2634.jpeg
The goal is to now have a wearable, replaceable insert, as well as to have more surface area to avoid chewing up bolts.

Some quick delrin spacers to adapt the width of my existing shackle hangers:
IMG_2636.jpeg
Now we were in business to test fit:
IMG_2635.jpeg
I’m hoping to be able to replace the dual shackles that were on this thing when I bought it. I hate the idea of the axle and tires dead hanging off the shock when the shackles unfold.

The taller shackle helps maintain ride height as well, since 2nd Gens have saggy booties.

Overall it was a fun project, and I’ll be interested to see the difference once I find and have the new housing into the truck.
 
Yep that’s the one! That was pre “Kickflip” lol.

I actually might take you up on that offer. I was taking stock today and my 1 ton parts pile isn’t quite as big as I thought it was
let me know it's just hanging in the shed. I'll make you a deal I've got axles and housing...
 
Haven’t been working on the truck much, since I’ve been giving the missus some weekends away from the 4runner, but here’s what’s been going on:
IMG_2701.jpeg
IMG_2711.jpeg
Doing some experimenting with hard bushing compounds,
A lot of toyota crawler guys run bolts with no sleeves and poly bushings and end up going through a bushing set a trip.

So I selected a Cast Nylon compound that’s filled with Moly, so these should be a self lubricating, hard wearing bushing that should also cut down on body roll by forcing the spring to twist instead of just deflecting the bushing.

I made some link pivot bushings for a buddy’s 3 Link 1 ton rig a couple of months ago out of this and have been satisfied with how they’re holding up enough to make a set for my truck.
IMG_2703.jpeg

IMG_2762.jpeg
IMG_2761.jpeg
IMG_2763.jpeg
Threw a fresh Diff stud eliminator in the new victim housing (thanks @dwphoto ) and threw an old diff armor that got saved from a junk housing on it.

I strongly believe worn out stock diff studs is why I peeled the case out of the housing on the last axle, so this should keep everything nice and tight.
 
Some pictures from some side projects I’ve been working on, been building and valving sets of shocks for some other toyota crawlers, Swapping some KR3s onto my truck.Helped out another buddy get a +5 Rock Assault into his sweet 3.4 swapped crawlerIMG_2765.jpegIMG_2734.jpegIMG_2766.jpeg
 
Back
Top