shi_thead__
Member
- Joined
- Sep 19, 2022
- Messages
- 29
This is my 71 f100 factory shortbed 4x4. Built to do a little bit of everything.
I bought it in 2017 to tow my baja bug but still be capable enough to recover the baja if it broke.
It was a 4 speed granny low 300 i6 single speed transfer case, rear lsd on a 4 inch lift with 31s. manual steering manual drum brakes. It got a staggering 14 mpg

At one point the baja was broken ended up towing a friends baja out with my trailer and just using the truck for the weekend

As i started using it more I decided a camper shell was a good idea.
cabover camper plus blown out shocks = slap wheelies up hills

After a season with the bug I found myself only going out with jeeps so I sold the bug and started using the truck. or at least that was the plan.
I was doing some minor trail near my house got it high centered on the front diff. got out to look and it started rolling backwards. I was running next to it trying to hit the brakes until I noticed the truck come up and I dove out of the way. It turned up an embankment and flipped onto the drivers side rolled all the way back onto its wheels and somehow stopped.


I sourced a cab, found a good deal on some 78 3/4 ton axles and transfer case.
I welded the stock axle wedges (early bronco style) onto the new axle
I was given a cj7 saginaw power box that I mounted to the frame.
The truck now had power steering, power brakes, front dual piston disks.
at one point I put a 4 barrel carb on the 6 cylinder dropped mpg to 11 or so bit more top end power but lost some low end response.

the bed was salvageable as were both front fenders
cab hood doors and core support were replaced.
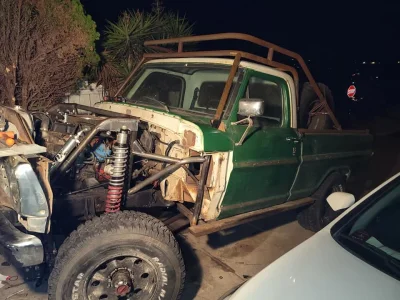
Then I wanted some rollover protection and the use of a utility rack


I needed a spot to sleep when camping so I built a pvc frame to work in conjunction with the rack to hold up a canvas tarp.
This setup was inconvenient and time consuming to set up. but decently comfy
As the build progressed the group I was going to the desert with stated to have faster more high speed setups. (3 door suburban 4x4 on ibp coilovers linked front and rear) (streched yj coilover bypass all around).
Basically I was running out of suspension so I came up with a way to pull more travel while keeping it all under the bed. (it comes through like 2 inches)
pushrods to a moving upper shock mount. so the shock drops as the axle drops. pulls 14 out of an 8 inch shock comes through the bed about an inch at full bump and bumps in the stock frame location. I was worried that it might have a digressive ratio but it stays very consistent. I also relocated the rear shackle hangars and put a long travel shackle on. Atlas leaf springs were added later.

Now that the rear had suspension I found myself running out of front suspension.
Bounced so much i broke a distributor
I did a a pillar built into the rack that mounts into the rock sliders
then built a set of tube towers and extended the stock radius arms
14 inch shock at a 1:1 ratio bumps at the stock frame.


Radius arms were a 1.75 .120 wall chromoly tube sleeved into the stock arm.
I saw the stress riser and figured it would be okay
I was wrong Snapped in half at the stress riser.
strapped it back together limped it back to camp about a mile and did some plates to get me home.
I added a 2nd 1.75 .188 wall dom tube under that similar to an i beam radius arm and plated them together


Some flex tests the front binds pretty good because its a radius arm setup but it keeps on road driving tolerable


In the beginning of 2021 I took a road trip from san diego to auburn/sacremento area to a cabin then to chico. from chico over tahoe and down the 395.
I got about 8 mpg and the truck was running horribly at altitude.
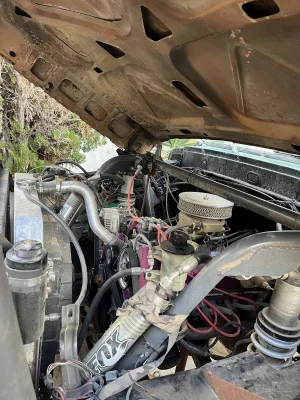
After that trip i went with a holley sniper on the 300 but that only improved minorly and I went with a stock roller block 5.0 truck cam truck heads .040 over.
I bumped the truck to build motor mounts and notched the pan a bit for axle clearance to get it as low as possible.
When i added the new block the old clutch linkage wouldn't work so I custom made brackets to use factory 80s ford parts. napa special
fuel pump is also an factory spec f150 pump
I skipped over any interior mods in this part ill do another post about that.

Currently redoing the lower tubes behind the cab for more clearance and some more triangulation for roll saftey
just finished welding a custom baffled gas tank to go behind the rear axle. around 30 gallons
need to mount it but im not sure how im going to go about it.
need to make a spare tire swing gate off the rear bumper
need to make a transfer case skid.
I also have a zf5 waiting to go in.
If anyone wants to see more of a certain aspect let me know
I bought it in 2017 to tow my baja bug but still be capable enough to recover the baja if it broke.
It was a 4 speed granny low 300 i6 single speed transfer case, rear lsd on a 4 inch lift with 31s. manual steering manual drum brakes. It got a staggering 14 mpg
At one point the baja was broken ended up towing a friends baja out with my trailer and just using the truck for the weekend
As i started using it more I decided a camper shell was a good idea.
cabover camper plus blown out shocks = slap wheelies up hills
After a season with the bug I found myself only going out with jeeps so I sold the bug and started using the truck. or at least that was the plan.
I was doing some minor trail near my house got it high centered on the front diff. got out to look and it started rolling backwards. I was running next to it trying to hit the brakes until I noticed the truck come up and I dove out of the way. It turned up an embankment and flipped onto the drivers side rolled all the way back onto its wheels and somehow stopped.
I sourced a cab, found a good deal on some 78 3/4 ton axles and transfer case.
I welded the stock axle wedges (early bronco style) onto the new axle
I was given a cj7 saginaw power box that I mounted to the frame.
The truck now had power steering, power brakes, front dual piston disks.
at one point I put a 4 barrel carb on the 6 cylinder dropped mpg to 11 or so bit more top end power but lost some low end response.
the bed was salvageable as were both front fenders
cab hood doors and core support were replaced.
Then I wanted some rollover protection and the use of a utility rack
I needed a spot to sleep when camping so I built a pvc frame to work in conjunction with the rack to hold up a canvas tarp.
This setup was inconvenient and time consuming to set up. but decently comfy
As the build progressed the group I was going to the desert with stated to have faster more high speed setups. (3 door suburban 4x4 on ibp coilovers linked front and rear) (streched yj coilover bypass all around).
Basically I was running out of suspension so I came up with a way to pull more travel while keeping it all under the bed. (it comes through like 2 inches)
pushrods to a moving upper shock mount. so the shock drops as the axle drops. pulls 14 out of an 8 inch shock comes through the bed about an inch at full bump and bumps in the stock frame location. I was worried that it might have a digressive ratio but it stays very consistent. I also relocated the rear shackle hangars and put a long travel shackle on. Atlas leaf springs were added later.
Now that the rear had suspension I found myself running out of front suspension.
Bounced so much i broke a distributor
I did a a pillar built into the rack that mounts into the rock sliders
then built a set of tube towers and extended the stock radius arms
14 inch shock at a 1:1 ratio bumps at the stock frame.
Radius arms were a 1.75 .120 wall chromoly tube sleeved into the stock arm.
I saw the stress riser and figured it would be okay
I was wrong Snapped in half at the stress riser.
strapped it back together limped it back to camp about a mile and did some plates to get me home.
I added a 2nd 1.75 .188 wall dom tube under that similar to an i beam radius arm and plated them together
Some flex tests the front binds pretty good because its a radius arm setup but it keeps on road driving tolerable
In the beginning of 2021 I took a road trip from san diego to auburn/sacremento area to a cabin then to chico. from chico over tahoe and down the 395.
I got about 8 mpg and the truck was running horribly at altitude.
After that trip i went with a holley sniper on the 300 but that only improved minorly and I went with a stock roller block 5.0 truck cam truck heads .040 over.
I bumped the truck to build motor mounts and notched the pan a bit for axle clearance to get it as low as possible.
When i added the new block the old clutch linkage wouldn't work so I custom made brackets to use factory 80s ford parts. napa special
fuel pump is also an factory spec f150 pump
I skipped over any interior mods in this part ill do another post about that.
Currently redoing the lower tubes behind the cab for more clearance and some more triangulation for roll saftey
just finished welding a custom baffled gas tank to go behind the rear axle. around 30 gallons
need to mount it but im not sure how im going to go about it.
need to make a spare tire swing gate off the rear bumper
need to make a transfer case skid.
I also have a zf5 waiting to go in.
If anyone wants to see more of a certain aspect let me know
Attachments
Last edited: