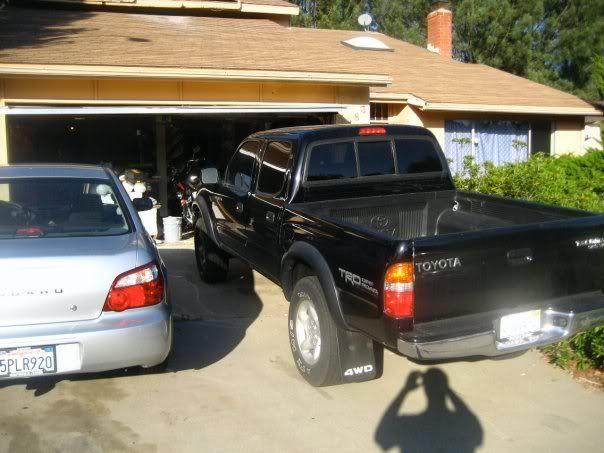
4x4 DBL Cab Tacoma Build

jonsangel

Active member
Joined
Nov 20, 2023
Messages
103
Location
Los Angeles
I need to work on transferring my build thread over but she is back and alive! I did a shakedown run at Gorman on Sunday. It was the first time the truck has seen the dirt in 9 years. Damn, it didn't feel like that long. Overall the truck did awesome. The front suspension is killer. It soaked everything up with zero adjustment. The motor ran strong and transmission felt great. I really only had one issue, the steering ram ripped off the frame. I removed it, plugged the lines and it drove fine. I'm not sure I even want to put it back on. The first real trip will be in 2 weeks and I'll get better videos. Feels great to be back out there though2023-11-20_10h17_41.png2023-11-20_10h17_20.png2023-11-20_09h50_41.png
 
HELLZ YEAH BUDDY. i was wondering when and if you were ever going to come on over here with the build thread!
 
Congrats, you've been at it for quite awhile. I don't see any 4wd components in there yet, did any issues arise with them?
 
congratz! You beat me to dirt!!

And damn, that shit ripped right the F off! Bolt stayed tight though. hahah
 
Congrats, you've been at it for quite awhile. I don't see any 4wd components in there yet, did any issues arise with them?
No issues, that I know of anyway. It was just more time and money to get all that working. I need to run the driveshaft from the transfer case to the front diff and get front axles made still. It's still in the plan but just wanted to get it driving for now

congratz! You beat me to dirt!!

And damn, that shit ripped right the F off! Bolt stayed tight though. hahah
haha, you could have beat me. When your truck hits the dirt it will be finished. mine still has a ton of odds and ends to do
 
Flash back to the past!!! I followed this on TTORA. I actually got a ride in this beast way back at a Superstition run, myself and @DTF_TACOMA (I think) went for a ride and sat in back seat!

Nice to see it still going and evolving!
 
I got about halfway through saving my thread on DR before it went offline. Once it goes back up my plan is to copy it over. I have tons of pics though. I've been spending a lot more time on the truck recently so I'm planning to be a lot more active once I get everything transferred
 
q7t4i2cbEFtA08OxA86784eCel2hZ9d9OJsx-aCM3G59Fv_o50nWSw0H9YUSz5_UGK_yzVy3Lj4RtWoqadsmthR2v3ff9QikUfOd1Xs69L_-6dCz1Jb4oOS1EShPHMsapm5lW4_DiTLWGTvczNHcizk

my new, stock truck

I had orginally bought a tacoma xtra cab prerunner (my first truck) thinking I'd never really drive offroad and would never need 4wd. After getting the truck I actually took it offroad and loved it. I built a pretty ghetto bolt on bumper for it and made it mid travel up front but the 2wd wasn't cutting it rock crawling. I traded that truck in and got a 4wd double cab. I got a double cab because I always read about people selling their 2 door trucks when they had a family and need to fit a child seat in and what not, plus it's cool having friends along.

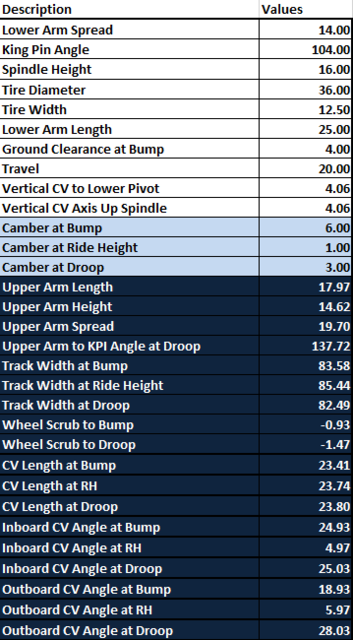
Current Truck Specs and my reference information


Suspension-
Front:
Designed my kit, 20". 4WD
Hubs - Manual locking 81-85 Solid Axle Toyota Pickup
Spindles - http://www.lowrangeoffroad.com/oem-replacement-chromoly-spindle-for-toyota-solid-axle.html
Fox 2.5 x12" Dual Rate Coilovers, 90/30, 6"x500#/16" x 700#
Fox 3.0 12" Triple Bypasses;3,3,2 (.020s)/30, 1x.052 bleed, Short 1, Long 1, Rebound 9
Fox 2.0 x 2.5" Bumpstops, 350 psi
Wilwood Billet Superlite 6 Calipers
What I ended up doing was the stock toyota outers (http://www.rcvperformance.com/product-details.aspx?sku=CVJ2851M) which is a 30 spline, chromoly, and good for 40 degrees. I'm using a plunging 930 inner (http://www.rcvperformance.com/product-details.aspx?sku=301174HF-28) and RCV can just replace the inner star to make it a 30 spline. Now I just need need a custom length 30 spline axle

Rear:
Ford 9" Full Floater. Grand National Cone Hubs
(31 spline, detroit locker, 5.29 gears,seal #417349, o-ring 2-223 2-243, NON SYNTHETIC 80-90w GL5 gear oil)
Wilwood dynalite calipers, .81 x 12.188 Rotors
All Pro 50T Pack w/ 12" Richer Racing shackles
Fox 2.5 x 16" triple bypass with custom layout, 4,3,2/ (08,08,012,012,012,012), Short 2.5, Long 2, Rebound 5.5
Fox 2.0 x 4" Bumpstops, shortened to 3" stroke, 75 psi

Drivetrain:
LS1 - 2004 Pontiac GTO
Cam - https://www.compcams.com/xfi-rpm-216-220-hydraulic-roller-cam-for-gm-ls-gen-iii-iv.html
Alternator Relocation Bracket - https://www.dirtydingo.com/shop/product_info.php?products_id=1488
Torque Converter - Oceanside Converters made from TCI Maximizer Street Performance Torque Converters 241602
Flexplate - http://www.turnkeyenginesupply.com/p...Flexplate.html
TH400 - heavy duty reid case, 300m shafts, billet hub, reverse manual valvebody, rollerized
NP241 - 1995 GMC K1500 Suburban
SYE - https://www.jbconversions.com/products/sye/np231j_std_sye.php
Output Flange - http://www.northwestfab.com/Toyota-Triple-Drilled-32-Spline-NP205-Billet-Flange_p_3221.html
Front Diff - 8.4" 91 MKIII Turbo'd Supra with LSD and reverse cut gears
Inner CV - https://www.rcvperformance.com/ulti...nt-chromoly-cage-300m-race-and-30-spline.html
Outer CV - https://www.rcvperformance.com/ultimate-30-spline-cv-joint-for-toyota-axle-kits.html

Steering:
Steering Box - 1966-1976 Chevy Impala, 4 Turn Saginaw
U-joints - https://www.borgeson.com/xcart/product.php?productid=458&page=51


Other
McNeil 05 Tacoma Front Clip
Glassworks 6" Rear Fenders
Black widow Muffler
17x9 Robby Gordon Beadlocks


sMo-rRizfjEaRS0XvLFDB4BqZyxMs3BGiX_ygFIeFwRknEgvtpqYvXnY5pdBHoHW3spvvZnCSvF3QMz16URxslrlb6EBHBejdUa2pB6PRYM-VwHCxmWWcxM-qn1WbPuvyjVnd-cNSBxc5VBmPJfD-Vo
 
Here's a few pics of my bumper build. Sorry for the crappy cellphone pics. I wanted to tie my skid plate to the diff skid but I would have lost some clearance the way I was planning on doing it so I'm just going to do them seperate. The tube that protects the radiator is .120 DOM and the rest is thin wall chromoly. I wanted the bumper to be able to crunch if I get in an accident for saftey reasons and also because I'd rather have my bumper give than my frame.
A picture containing text, electronics, display, monitorDescription automatically generated


A picture containing car, outdoor, transportDescription automatically generated


11/7/09
I mounted 6.5" Glassworks fenders this weekend in preparation for LT next weekend and the came out pretty good however it was a lot more shaping and sanding than I had imagined. I couldn't get the stock mounting for the turn signal to work in the new ones. It only mounts using that screw from the top of the headlight and a bracket that comes off the side of the headlight. How are you guys doing it? i also put in a magna flow exhaust and it sounds pretty good
A picture containing car, floor, transport, nightDescription automatically generated


pretty goofy looking w/ stock width
A picture containing ground, toolDescription automatically generated


from this
A picture containing ground, dirty, old, cementDescription automatically generated


to this
A picture containing ground, stone, dirtyDescription automatically generated


welds came out pretty good but Im not baller enough to weld while I walk around it so I had to start and stop a bunch of times
11/13/09
I got all my parts in for LT (thank you poly pro). I got the Camburg LT kit and was originally going to go w/ SAW shocks but I couldn't get them in by friday so I switched to FOX (Im inpatient). I also got the total chaos spindle gussets. I started the install friday afternoon and worked til about midnight but only got this far:
QdLk4LqWUS8GpN_5sgosMF6sTQAq9rwOg8qaGMm--7mOn0-j-3kEb_WFY0Co1VR6ZJ3F24OlbIg2o7iXA5RtpTjziebyAygBD9QSp4YDLpRCd2Kvb16YKg0znq3at2CtKr5eE_y9bGexNjbNBaxxTMs


I didn't have the correct size socket to take out my CV's or get the lower ball joint back in. Also, the upper arms weren't tapped for the zerk fittings so I thought I had to tap them before I could move on. I ran around all of saturday morning searching for the right tap only to find out the fittings go in without having to tap the holes. There were absolutely no instructions for the camburg kit so I didn't know. I worked all of Sat and half of sunday and limped my way to an alignment shop. The tires were squealing everytime my wheel wasnt completely straight. here are some pics from the install:
A picture containing toolDescription automatically generated


A picture containing dog, groundDescription automatically generated


Rxn3DN8_YGjM93FySh8f15PJG7gDFCGi2rQRuy_QuEk3QXArz6udpRF7DbsplTa9pRUiE660ACkzl8QxrI_Ydyl8KTLMXAjqW_SDt2OKj9LMmlgIUDi1dlurK_gH5SpyL4gX8gBcUVwuZJSky3yYU1A


ball joint tool haha
M4k4lwsDzfmDajudxhvR_S5EoAhAZwc6j9C1m2CDjY8jax5ZGNvHVEku2dyjSPr8jglj5L8KBHmkeLgfIY-vLGuNcF-Rwzoikax6MID9puWR5r_6q3-3mVeQ-8_FmlxDpNTfowZp43eGSmJAQRFRXqk


I got tired of the ball joint moving while I was trying to press it out
A picture containing indoor, tool, dirtyDescription automatically generated


spindle gusset
aDtF_coEe-VQztPe5ydxGbrs_y4-jcDgvM0X3QtpOCxsyOJX_EUio4LW4Y96cun2z6F_FFYEjBU1WHjmHvKEkaW9no-6j-OqsqEpGS-MeysJjf_MeJzgFBwgqyJgW7f_15tb9O8lthu3MkQY-HFeOG4


LT vs stock
A car that has been involved in a accidentDescription automatically generated with medium confidence


bump
xLiXsRui4U5bC68yqNooARAnOVsUwAlmzy5u51txQvQC1OP_DNDVrdT6NqdAt1laqDBNrsjb-1gU9w1ysOOW1FFn0aaWEBDZ0Tz9xjHRSVv5n06bjfp8QJYw2FstWMxk7Hev0JyrN8E0nr5XIsdD2cU


droop
A picture containing outdoor, car, ground, transportDescription automatically generated


Poser pic

I also Upgraded my brakes to the tundra S13WL. I had to grind my lower are because the rotors were hitting them. I painted blue with duplicolor caliper paint. It actually matches my rings pretty close
A picture containing person, indoorDescription automatically generated


clearance after grinding
VuhfM7xjMef0bVkqXiepw8_Tim-oWheQ-xTVtcXOLGIXPy4aiFlowhKAYd3ZzXGdtXmV4O6rtojxJkWO7QZfOSAxqEti66syLKtDkHpVyC_Mhh0wvgxcyssoQxnTX-YvdueDB1fgku34jX1PZn-7PxU


9uvI3AYhBKerU7gYFf8T4VIrCgI-rWTnbP2bT58aZZzAeR2F7ptH2c6ZAkq00inaPXRBHeyDAsvSDjaUHS0rrXwjcKt_8XlnbWYwcM74Fd9ArK5QEBfq1ZJpHrfnT6sQ2JPqmWQ6wHK3h0COzRNRyqs


Booya
 
11/28/10
This week I trimmed my fenders so they wouldnt rub at bump. I relocated my windshield wiper fluid pump higher so it wouldn't get destroyed and put my stock bumps on the frame until I got actual bumps stops. Lastly, I made gussets to go on the outside of my spindle. I heard they were weak so I decided to reinforce it before I broke it.

Before:
A close-up of a car engineDescription automatically generated with low confidence


After:
A picture containing metalwareDescription automatically generated


KY-8D7AGH41H4GHk0DQ2AQHlrh7YW3RVZ4OqL7WqnTPBv-rLlr47jtrD04ipDRfx3mzTX1GYA1MPAtH9QsT_XqC51nLEOjlMkdXn8TFI0515LCWTpbCkgtVBWCoChlZEWIvawKidHpTLhm0tjWu5X_g


Bump stops:
A close-up of a machineDescription automatically generated with low confidence


I drilled and tapped the frame and they screwed right in. M10-1.25

Spindle Gussets
A picture containing indoor, floor, dining tableDescription automatically generated


templates
A group of knives on a tableDescription automatically generated with medium confidence


plasma cut then grinded
A close-up of a car engineDescription automatically generated with low confidence


Welded on and painted
A close-up of a machineDescription automatically generated with medium confidence


There's just enough room to get an end wrench in there
1/4/10
I received some parts. still waiting on the bypasses and steering rack bushing kit
YGN2yXW1ZWFoHD6jDktp1qLMD5sFrT6kVlFZjXr8KjCZOHOHP1tkezpddcNUpbsg0SWhW8Oj1WiL0KbXaL6b4M0TXWNM8aenEmC-toLlgXk-qRWSaALE0zpUFoEmOPq2myEjd8oEkPAn2Vlavdyi0D4


I found the shocks I need on dezertrangers today used and a bunch cheaper than the ones I just ordered so I canceled my order and picked them up after work. Since I am putting the shocks on the outside of the frame I was a little worried that they were piggyback and not resi because the overall width is bigger. The width of the shock in the orientation I need it is just under 5", the gap between my frame and tire is just under 4", and I am adding 3" per side with the tundra axle. That leaves about 2" extra. I will probably favor the frame side since the tire will move closer on articulation. Here are the shocks
A picture containing floor, weaponDescription automatically generated


I also took off my bed and made some sweet temporary mud flaps to make the popos happy.
A picture containing transport, night, carDescription automatically generated


49YUVYOd35LgdF2ja3LyBmyf2ehoJOI-b02TCqz_WVS0_HeY1HQnhVklOZxi0Qp7JQ_hGrs0SNnDA8P2XvPA3_Wtys-4N1gwQhq4rqTNE1sKS85TBFsnmSFjLmvDlGk3h_lyYMaB2loxrk_rlHTC8Kw


Here is the clearance on the stock axle so imagine this but with 3 extra inches
A picture containing indoorDescription automatically generated
 
1/11/10
I did a ton of work this weekend. My parents let me borrow their car for a week so I took that oppurtunity to decommision my truck. I started off by welding in a temporary crossmember,taking out my spare tire crossmember, and pulling the gas tank. From there I started boxing the frame. I ended up doing in three pieces because it made it a ton easier. I've only done 2/3 of each side because I have to wait to take out the gas tank crossmember to keep my frame from springing. I made cardboard templates and got the CNC plasma cut out of 1/8" plate. Here's a few pics

I tacked it in place then ground the edges to make it flush with the frame before I welded
A picture containing indoorDescription automatically generated


One section welded up
A picture containing ground, outdoor, weapon, cementDescription automatically generated


After that I had to cut off stock brackets and I ended up having to cut off my sliders because they mounted right were the front spring hanger needed to go. Im going to tuck them in tighter when I put them back on

Cutting out brackets
hzV5rI7ClMjkKDwqwYCvqnEQW6zvkOEmKRb64wbnQKQ_pJaNzwl4_NB65MLBdve9ibU-JJ4O-sHZbAQISclnnMhJqvX5mju8-yzQPsZv2nsbzC78Ptvrv8eBbqdPB07aY6n-QIv1_imhh2uhuQ2MPek


From there I started locating the spring hangers and shackle mount. I took the length of the spring from the hole where the axle mounts to the front eye to get a rough locating measurement (something like 28" i think). I took that measurement to go from the stock bump bracket on the frame to the eye of the hanger. I tacked the front hanger then used the magic 52.5" to located the rear. I have F67's and a 12" TC shackle FYI. I cycled the leaf to see where the axle mount would be at bump. It ended up being .25" too far forward so I moved it back. I also remounted the rear shackle at 52.5625 to give a little more clearance between the leaf and the bottom of the frame at bump. To get the location of the other front hanger I copied the measurements from the back of the frame and also from a random hole towards the front of the frame. I got it to within a 1/32", I think that should be okay. I tried using the cab mount to locate it but I found out that they were actually 1/16th off of each other. Everything cycles really good but I ended up forgetting to get the travel numbers after all that haha. Here's a few pics

Spring at bump
cTl2dhB_Xp0_kouwkrfS6tfOK2wN5G6ZiMBnA0MeLSqlbr0DK8IJ7FecplU4_awsrfCjJLQr_XpePd42BYd5e0if8QvG7qNTDJk9mHN1tT-0uYSwBS6VAh4Aq4mengf4snFeSZWT9SMJSwtr54PuDAU


Spring under its own weight (the frame sprung in a little after I removed the bumper and hitch) The shackle will be centered once I get a crossmember back in there
A picture containing floorDescription automatically generated


Shackle at bump (I think the bottom of my frame is bent a little)
QsNq8pu_-BLN8TH7LZJQiXux6Ientr9IhESdd3oHTkT_Or0_S8OEDh-fZZ5qkaVqwQk1G51892VqONZh-y4bZEOWuCRHW0aNSOvvrEhXpLbVWNOt6wJ4fo-Y8zxOaXMPKNNBqJB_vUqvRfbhkkler9U


Both springs in
5X8lmZFicPG0KkRNM0vClxzHjnuIy2cRoCa9pq9H---KIkzmoW2X6M4VWPyW-maVqcqYNva5XmZiMvu9SuF9wkdbJnvZMAGXE57Gr5nIv9QnAWENoWkYZ2eQIbyx9e0lkvwRZq8hsk1GSHSCin5EA3I


BHOuaG-CQHW12MyZW5TIq1iOHkDF-HGkm4xasshM6S-N_M3BirgFTjE1s-el5c-zgSU1b-MISkE9Pfob2dJkwTOww0eXZFWEFXRXhoZqsfPKtCpRcBA4ZbHUcgUwl54IgS9X_p4Xtc_mKW6hJRpkOfk


I'm pretty happy with all the progress I made this week. I only ran into a few minor problems. I didn't know that the shackles didn't run parallel to each other. The mount to the frame is wider than the leafs and the shackles were on upside down so there were massive gaps at the bushings. I also wasn't expecting to have to cut off the sliders. I'm picking up my rear axle from getting a trusset at the Truck Shop today so I'll be able to cycle it with an axle and check my clearance for the shocks. I also need to get a new welder to weld all the thicker stuff. Everything is just tacked now.
 
1/11-1/17
I did a ton of work over the last week. I was hoping to be done by today but I'll definitely have to carpool this week. Here are some pics of the progress

Center crossmember added. I plated the frame with 3/16" where they meet. I'm going to add some gussets soon
A picture containing indoor, dirtyDescription automatically generated


The end of the frame sprung in when I took off the bumper so I straightened it using a bottle jack
A picture containing floor, indoor, appliance, oldDescription automatically generated


Crossmembers in and painted. The back crossmember is just a temporary one until I figure out what I want to do for the rear bumper and spare tire carrier
A picture containing indoor, floor, oldDescription automatically generated


I decided to notch the frame to make a little extra room for the shock. I used 3/16" on the outside, top, and bottom, and then 1/8" on the inside. I took out about 1"
A picture containing ground, dirtyDescription automatically generated


A picture containing ground, outdoor, old, dirtyDescription automatically generated


A picture containing clutteredDescription automatically generated


rGb641z696taXwcYVTjCVi71RW-YK4_hJKIjW5wgsGHxUVbHA2IatdE5uMte8kolCGoDtpMjod27ZnG4KPw3nlIm7WG_bYM6MEK0DBe50y_AyB3CqGfVWLDoY-SgSjZXV5xYUKSXhufxBinnMwbCycc


To find out where I needed to mount my shock I drew two arcs on a board by putting a sharpie through the eye of the shock. The blue arc is the compressed length of the shock (+.5" so it wouldn't bottom out) drawn with the axle at bump and the red arc is the extended length (-.5" so the shock would over extend) drawn with the axle at full droop. the green arrow indicates where they intersect and where I need to mount the shock
A picture containing parkedDescription automatically generated


Checking for clearance on articulation
A picture containing outdoorDescription automatically generated


A picture containing ground, outdoorDescription automatically generated


There is a ton of room which sucks because I ordered custom shocks last week
S1EYwc-86hpcX-3E6oGMhZWKRgoArVaeguhNgVyhtlFNDqXqVOyhX98plAx7BHqOf0QsGhHgZNndv2JbEA07J4u2qjYIoDb2qXh-135c3oxS353MBgw6dGk8UHjRcu6i2cLbhjxnrqIFjPXwZ7nH-z4


I made the shock hoop from 1.75" .120 wall DOM. I plated the frame where they meet with 3/16" plate. I plan for the shock to come up directly under the hoop and plate the sides
UAcpLzgAjmw5smfxJYvTZRafh3rHkziIpzX1LKM0nGrDQ4UrARXXyDt7RVrn_sEeVYT7x4zLMlB8OZy5cWGo4DhFEP5o1bjfRIlQ-kaqfJHCSIzB6jf1j0-pUoF_x2v2_rqHXaYwNxoyJoQDjdAKnLQ


chFxb4XHXPFO-edAxj_Oj2Oa77WXFWD8JKloBlGYxHwXpgq3ZOGjJG92UMpBaKwNh7w6R9M5P1lbmixdslm8JIwuJw0ITGN7Spusv_uOxUrgVIRCv-Hhlv-qZYqoFV3_s5otWKC-13HE0DufgPlnhic


I got the limit straps mounted as well
A picture containing indoorDescription automatically generated


KkyidPkxCx8qqdCfYyKcjY1O0lvyB5SiBTNZY1QHBoPJQZI_yjbuUExmVhxdJlulXBkWukWaeFBbIN2VxjVuA__f1K0yeN9TiytqF3JfnR3wLnltbtkZhMdbuT5b9NErkdvTIvwTLEmTIiw6QXtyE8c
 
1/25/10
my new shocks:
Diagram, engineering drawingDescription automatically generated


I wanted to have the resi come out of the top cap but FOX said they didn't perform as well
2/01/10
My truck is driveable again!
I decided to regear the front right away so my truck was an entire mess from front to back haha. It was completely on cinder blocks.
A car that has been involved in a accidentDescription automatically generated with medium confidence


The powdercoat load came out pretty good. its pretty close to the fox blue, just a hair darker
A picture containing indoorDescription automatically generated


While I had the front apart I also did the bumps and straps. It came out alright but I'm definitely going to have to shorten the stroke from 2.5 to ~1.75 because the bumps hit way too early
A close-up of a machineDescription automatically generated with low confidence


NB0lTn42wr-Hk0_SswgvQxkZapxwt7fUpvg8BtbtBGerM4QsSd2ib4si_ylqR4id98tALMYY4JIES28WRXQcXfwPBbKzUwe6GlcanN-tIahTcMPj3f72g0dHlzF8Qwlz2xIGnhdFoMH659XrcihDxzc


A picture containing car, vehicleDescription automatically generated


I finished my bedcage. It should tuck up pretty tight once my bed is back on and it shouldn't stick past my wheel wells
bNdAjKOkodFXuGKxlZaNkwoAC0f1yXBhRrurcggAXYRizwzlLUgY3S1Ss4ic2NfRa0anJsCJEq-4aABHLTH5DcybU8tT3gBR6f7ewOoP4yJO7CmKY5PV2uue0_mIWTAthrumMdZhTp3cTPfHqmjV-_U


A picture containing transport, carDescription automatically generated


I decided to change up the crossmembers a bit haha
A picture containing outdoorDescription automatically generated


A close-up of a bicycle handlebarDescription automatically generated with low confidence


for those wondering how Im gonna get my bed back on my plan is to have the front seperate from the bottom and sides so I can slide the front section in between the cage and cab and the other section will slide in from the back. If I do it this way I'll be able to take my bed on and off fairly easy

Here's a pick of my pinion angle with the shortened dshaft. Im glad after all the work it took me to find it it actually lines up
18W-ZCGqAF4jXiYAn5xHqLXtS5asdMSq-KHVQXcw9TQK0WDhULxASlI2-u4LPxN_WaiMaq2RHwvhoBGbdwaLyhykdtTH33VzaGlDKKR__hK1dMsNSbV0eNS9HCEcAwbJMhu8Q4F1cUsLME3_C72hbVo


Rear bump
A picture containing dirtyDescription automatically generated


Rear end finally getting put back together
A person working on a machineDescription automatically generated with medium confidence


I got it all put back together at about 3am sunday morning but the brakes were super soft and I couldn't make it better by bleeding it. I took it to express tire and they just kept bleeding the rear a load and it finally got better. It still doesn't feel 100% so I may try some more. I got to do some test driving and the truck feels amazing. The rear shocks are tuned for a buggy and they are super soft so I'm really only feeling the travel numbers but just that makes a world of difference. On the freeway it drives awesome, absolutely no vibrations. The amount of body roll is ridiculous and I think it is because of the shock valving being off but I dont want to deal with that until I get my new shocks. The ride hieght is also really low, I only have about 8" of uptravel with 9" droop. I'd like to have my truck sit about an inch higher in the rear so i guess the solution is to get the leafs rearched. All in all I am extremely happy with how the rear turned out


A picture containing outdoor, ground, mountain, dirtDescription automatically generated


A picture containing outdoor, sky, car, truckDescription automatically generated
 
2/7/10
A picture containing outdoor, sky, ground, carDescription automatically generated


A person standing next to a wrecked carDescription automatically generated with low confidence

2/22/10
Added Lights with a ridiculous switch. I put it where my diff locker switch used to be. They're semi-temporary until I make a light rack above the windshield
A picture containing car, outdoor, parked, transportDescription automatically generated


A black car with its front facing the cameraDescription automatically generated with medium confidence


_2zJyATDCRs-TXeicgk8Y57838vKkjvnV1CuawgqoKsMEw1OrZmk4U8jv6TMdF6GVWygbGDWcyYgalOiEVAaxCRiZitKW_oKi4v_A7XTBaKjnp65S0WDN8hMSIIe6jtbJd66jcpMGp6G67ctJKzhyMI


I got the bed mounted. Still have almost all my bed space which is exaclty what I was aiming for.
A picture containing car, outdoor, metal, rackDescription automatically generated


A picture containing steelDescription automatically generated


A picture containing indoor, gearDescription automatically generated


A picture containing outdoor, car, road, truckDescription automatically generated


Looks goofy without bedsides but they are supposedly going to be finished by 1st week of march

Now that the bed is mounted I can have a better idea of how the tire carrier is going to mounted. I'm gonna start that this weekend.
2/23/10
Received some parts today
A picture containing text, adapterDescription automatically generated

3/04/10
I got my shocks in last week. They look like theyre going to work great but the only thing is the resi's are massive. I'm going to put them in this weekend and I also want to move my lower mounting points outwards to give more clearance at the frame
ge83iXnMv1gRBfobFZZa_3mJntPvAMv-QP0Ek2ZaXdNH6SHb4roEVeZHRLG2BDQtnVErVqcfP9A9at8p4qItW1agD6k_PbRsY3iS8PgzF4iaHOjS12uyYS27TfcVq2NQEgB6aQahg4cgnOOYoMv6c8c


side view
A picture containing wall, indoorDescription automatically generated


I got my sliders back on last week as well as my remote tranny cooler and filter. It actually ended up fitting in my bedcage perfect
A picture containing car, outdoor, road, transportDescription automatically generated


4l49nkCkdf36RXygtvseRYPuHqJYXWyoXpcCipV8fnV4hBNz77TorfLwq-V7sOiKoMJgEKX3PsyMVKAB79D90YBPtg_1BEQRJpJf3cK-Tf9y_mQG3WgzEO6ZLZ_nRTMurZH6r2fHeQ7srj-kpZHO_9E


Tranny Cooler
-OH1rckgEOKgCFFxIPNWSZozWRmM40bsJUscl08Qorf8B8PH0HmioS6Rjb4LbL_W0E8YX7PitBg6vSYkDV4LN6SgC-ijbgmRkz_k2P-hHy3h08fcvfSah6uNF61BcPNOf78eZqhx6NDmFQ6wmLb3Ez4


_Dw8Gyb7xUGYBbUp2AalUmge-KsNvJh5Zd78DFrJNP1RGWi-nNRdXQjRGGxTrrQzq6-wQx8Nk6F9TIkJR3FomXBJHXKaVLFED-7EF7GupR57LMqlsDS2oJD-nOF9j5RsTE-5G8RAkE24tiFLURUYiNw
 
Here's a quick write-up on what I did.
A picture containing diagramDescription automatically generated


From the tranny to the radiator is just a stock line with no modification except adding a sending unit. I used a tee with 3/8" barb fittings to adapt to the 10mm hose.
From the radiator to the filter I used a 3/8" tranny oil hose. It went right on to the 10mm nipple coming out of the radiator and I had a 3/8" barb coming out of the filter.
From the filter to the cooler is just hose and the auto switch just taps into a fitting
From the cooler to the tranny I basically flipped the old line that went from the tranny to the radiator and added more hose. it wasn't the cleanest way but definitely the easiest
That sums up the plumbing. I pretty much used barb fittings and hose clamps everywhere. Pics below

Mounting of the Cooler
-OH1rckgEOKgCFFxIPNWSZozWRmM40bsJUscl08Qorf8B8PH0HmioS6Rjb4LbL_W0E8YX7PitBg6vSYkDV4LN6SgC-ijbgmRkz_k2P-hHy3h08fcvfSah6uNF61BcPNOf78eZqhx6NDmFQ6wmLb3Ez4


Filter
A picture containing indoor, dirty, kitchen applianceDescription automatically generated


Sending Unit
zkFDUYD-86JquplNxswZb0UQBqbcwoxwWYhokWtZ4KX21r8-qeIM2wHUTJp3hjizNAwIo1trJF9jeUpnqlilR1rZtcfnfF_OJLGFj8zjcV2bAH6F3H6rHp_3a640Xz6kemG2Zb7o8wHhqEB7WnePArQ

I wanted an Ignition on so I couldn't forget any of my accesories on. Here's how I did it
I did the Cig lighter mod to always keep them one which left and ignition on power source open. The blue wire is for the cig mod and the red is my power source. I ran the wire from there to inside my cab to a relay
GVzMWDr4fp-_BCuPPEiWb_kRt_GUTX-ko8_jgx0w9jOygKQQNTR6yWCIbeeky5D1I6STM_FiZS3d_EeQjujfJKU8MZri4SE2kdt2t_z9IyBovtgdmFUuQdQLQ51gw6geEJg2x4d2iCu2_TAXdmQxXVI


Here is the relay. It has two switches so I put my lights on one and use the other to run everything else
IB-lNJFCJVfeGkXceIXpbz7euqH-Q5Ei6lnzmuoPUaSL2OypbzHJTCtLjd1OYWbDYNWQd6W_yicJpbF6HX489I8HVFYrKI0EHHWT7Jk7bCoscfRhOLWlc9uEYPMAwGSWs8gxV-6fz5yzsiLggwQ2D0o


From the relay I added this terminal strip to add my fan, gauges, and whatever else from
6rSgRVRSYGbuMgO5m_XuMf2P30CcBU1Dh107XmjH_O8fRKB8-mmtVTF8iCoMjoum9arbCdALk7eTavx1eThbbkDsU6lRTpNBnDQjBmjrdbCx7w8uLwIIeXksNcvQeapX1qLeum18mT4bQ6dw06876Qg


nvxiRUq8bubFPQy0tovZh_dc6K8-OcFCwfZZyQVxIP4eLG-ljHUe9ZMx9rvSawjZ0JyMx-zZoF3UYZ12fYjot8jgxk7i8kN0Ayhsvjiehjq1EOrU0JqiBZOOSi_5cKHjDQhGLbPYsGvs8lSflGBxqR0

3/28/10
I got my gauges mounted with a pillar pod from lotek. I accidentally ordered the wrong color but I just spray painted it and it came out pretty good
A view of a street from inside a carDescription automatically generated with low confidence


I got my bedsides from glassworks. I'm very happy with the fit but I'll have to trim them to get a better departure angle
A picture containing outdoor, sky, car, mountainDescription automatically generated


A picture containing outdoor, car, road, transportDescription automatically generated


Had a little too much fun and tore up two of my rims. hopefully I can just replace the rings and they will look new again
A picture containing text, closeDescription automatically generated

5/12/10
I got a few small updates. I added a barrier for the shocks so stuff if the bed wont hit them. It's thinner gauge but I reinforced it with some round stock. I also added a few attachement points for tie downs.
A close up of a car tireDescription automatically generated with low confidence


A picture containing tool, dirtyDescription automatically generated


A picture containing stoneDescription automatically generated
 
Back
Top