08 Dodge Megafun

Coming home from the only real complaint I had was with my bed setup. So I am doing another bed reorganization. Mainly flipping my drawer and fridge to opposit sides of the truck. But there are other ideas I want to incorporate at the same time.

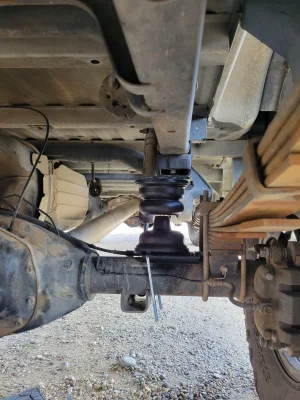
I wanted to also move my house batteries from in the bed to below the bed but I couldn't figure out a way to do it the A) wouldn't hang to low. B) wouldn't require major fab in cutting the bed floor and/or frame crossmembers. C) wouldn't be in the way of the third member or exhaust. So for now they are staying in the existing battery box located in the drivers side front of the bed. I haven't decided if I am going to relocate the OBA and ARB compressors yet.
 
This is the start of the new setup. I rebuilt the drawer front as it was coming apart. When I originally built the box I left a cut out at the back that held 2 5gal water and 2 5gal fuel cans. I cut that section off and boxed in the shorter cabinet to help with rigidity.

20221201_143742.jpg
 
Just ordered some 4ga cable, a smart battery isolator, remote terminals and a few other odds and ends. I figure since I need to rewire for where I moved the compressors that I might as well finally wire the house batteries on a isolator from the starter batteries.
I was charging the house batteries from the 12v power on the RV plug. Problem is this creates a constant connection from the starter batteries to the house batteries. It isn't a problem on trips with a bunch of moving each day, but I would have to get jumped on the more "just camping" type trips. The 4 ga cable is probably going to do a much better job charging the batteries than the 14ga wire I had running to them as well.
The only thing I haven't figured out is whether I should run a new cable all the way back to the OBA compressor separate from the cable going back for the house batteries from the isolator, or if drawing the amps through the isolator will be fine.
The only thing currently on the house batteries is the Dometic fridge. But I hope to wire it in such a way that it will be easy to hook up the inverter to it and also to hook up the battery charger remotely.
 
I think the size of those terminals answers the question of running the compressor power though the battery isolator. Looks like I will be running a new 4 ga wire from the starter battery to the back of the bed for powering the compressor. Probably run a 10ga wire from there to the isolator and from the isolator to the house batteries.
20221216_152729.jpg
 
Mounted these posts for a spot to run the 4ga wire too and to have a easy spot to hit a good wire spot. I didn't want a accidental hot anything in the bed and this is what I quickly came up with. Don't tell my wife I am using her snapware container.
20221216_163004.jpg
20221216_165020.jpg
 
I am sure there is lots out there, but this is what I had available when the idea hit me. And it was essentially free.99. If it doesn't hold up I will look for a better product.
 
I ended up running new 4ga cable all the way back to the post. Then ran 4ga from there to the "starter battery" post on the dual battery isolator. I then ran a jumper from the house battery's to the other post on the isolator.
I ran a 4ga ground wire down to the same spot on the frame the ground wire from the house battery already connected. The Smittybilt compressor positive and negative connectors go the the isolated posts as well as the ARB compressor ground wire.
All the cable crimps were done with the Harbor Freight hydraulic crimper which I highly recommend for its easy use and quality crimps.

20221217_153133.jpg20221217_153216.jpg
 
What a absolute pain in the ass. Went to pull the old airbag brackets off to find all the tapered Allen bolts frozen. They wouldn't come free even with a overnight of PB blaster. So after having on 3/8 drive 6 mm Allen strip within the drive and another snap off inside the bolt, I started drilling. 2 of the I was able to drill clean through 3 of the bolts with a smaller bit. The one with the Allen stuck in the head wouldn't start. When I stepped up on the first one the next sized drill broke off inside the bolt. So I just stepped up to 3/8 and drilled off the heads of the other two. Going back to the one with the broken drill trashed the 3/8 drill bit and I quit for the day.
Yesterday I took drastic measures and fed the Sawzall into the frame and cut off all the top side of the welded threads with what was left of the bolts with them. Then I drilled out the holes to match the 1/2" of the frame. I still need to get in there and clean things up some more. I don't think I will be able to get the internal plate out but, I think I can hand feed nuts in there to get the new brackets on.


Screenshot_20221228_091606_Gallery.jpgScreenshot_20221228_061049_Gallery.jpg
 
I am going to be using these Sumosprings when towing my toyhauler. I plan to remove the bottom half when and use the top half as a bump stop when not towing. If it is too harsh then I will just pull top and bottom for daily and trail use.
I bought them from Point Mugu club member and local distributor for them Ruben Clark Auto trying to support local vs ordering direct from Super Springs. He had them to me the next day.
I will update more when I have a day off with clear weather to work on it.
I also have some Tuff County sway bar links to get the sway bar back in use for towing. I have been running without it for a while now. I plan on looking into making these quick connect with pins similar to the ones the jeeps use. I was just unbolting a side for trails on the old set I had.
SSR315472_500x500.jpg
Screenshot_20221228_094020_Chrome.jpg
 
So I put the Supersprings Sumo Springs in place for a little load test. I think I am going to need a 1/2-3/4" spacer between the lower part and the axle bracket to keep the truck level towing.
Granted this is a empty trailer and not on flat ground for measurement. I also did the test with 4 links loose on the torsions where I typically set it up with 3 links loose.
I will also need to use the outside notch for the ubolt as the one under the spring interferes with the shock mount.
I did find that the trailer jack does a fantastic job raising the back of the truck up enough to get the lower half in and out. I will probably install/remove it the same time I have the back raised to install/remove the torsion bars.
The plan is to leave the top half as a progressive bump stop. Hopefully I can get the rear Kings repaired before I try it out to much.
20230101_114343.jpg20230101_114855.jpg20230101_115546.jpg
 

Attachments

  • 20230101_114756.jpg
    20230101_114756.jpg
    386.4 KB · Views: 5
Did some hoodrat weed abatement.

Screenshot_20230105_191736_Gallery.jpg
Also thought pulling my trailer around the tree was the best way to get it lined up with the access road to the driveway. It wasn't. Had to put it in 4 low and pull the trailer over the rocks and through some branches.
20230107_151255.jpg
 

Attachments

  • 20230107_151255.jpg
    20230107_151255.jpg
    733.2 KB · Views: 1
Pulled off the rack and tent as I have no camp plans in the near future that need it. Still need to unscrew and remove the drawer.
That is with the swaybar hooked up and the sumo springs in place. I think I could get away with some light wheeling with them fully installed but it definitely looses a few inches of stuff.
IMG_20230107_153308_047.jpg
 
Back
Top