Raptor and rail better than golf cart?

blue oval

Member
Joined
May 17, 2022
Messages
77
Yes!

Mostly everybody I ride with switched over to SXS's and I refuse to over pay for a rubber band car that is obsolete in 5 years. I was determined to find a trailer AND car for the same price and get the whole family out.

2005 Keystone Raptor 3319 fifth wheel and a 2005 Sand Trix sand rail


IMG_0013.JPGIMG_5189.JPG
 
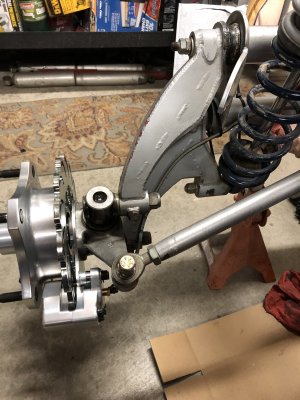
There is a lot to learn about these cars, but there is a ton of information if you know where to look. For those that don't know, a car like this is built off the suspension design from a Volkswagen bug. The chassis in my rail literally has the frame horns from a bug built in to locate the transaxle and trailing arm pivots. A lot of the technical information I've researched has come from Volkswagen sources.

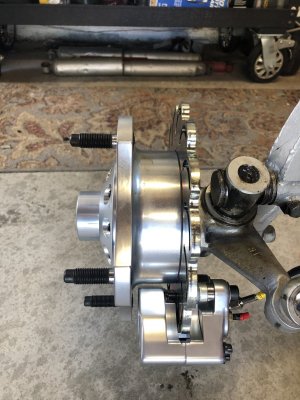
The front and rear suspension are a trailing arm design, and although limited, they are quite capable. Compared to a stock bug or Class 11 car, the suspension components on my rail are "upgraded". In the front the beam is 10 inches wider (the two parallel tubes, not whoop scissors), and the trailing arms are 2 1/2" longer and uses coilovers instead of torsion bars. The rear trailing arms are called a 3x3 (3 inches longer and 3 inches wider) and also uses coilovers instead of torsion bars.

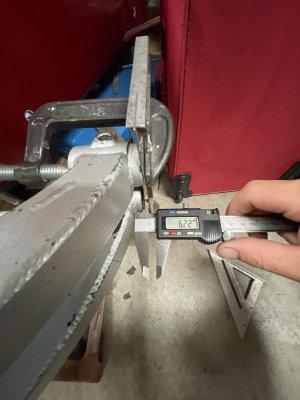
The front end doesn't have a ton of travel, but it is so light it skips over the top of bumps. You can pretty much grab the beam and pull the front end off the ground. The front is limited by steering tie rods, trailing arm length, and shock setup. I have an 8" stroke shock now, but its common to use a 10" shock.

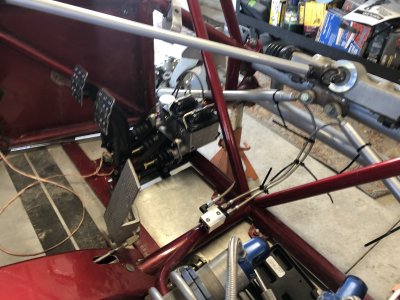
The rear end is limited by ground clearance at bump and CV angles. I have a 3 rib bus transaxle with Type 2 CV joints, so a pretty limited setup. The Type 2 CVs get around 17 degrees of angle before they start to bind. The normal upgrade for this is the 930 CV joints with around 25 degrees.
 
Last edited:
Since I've owned the rail I've done a few things to maintain it with minimal upgrades.
  • Replaced all fuel line with AN braided hose, AN fittings, and fuel filter before and after fuel pump because the bad gas destroyed a lot of the old stuff
  • Replaced rear brake lines with braided lines after discovering the original rubber hose was being stretched at full droop
  • Installed front brakes after discovering aforementioned rear brake line broke and had a wild ride down a hill in Barstow
  • Installed dual brake reservoirs with balance bar
  • Replaced rear trailing arm inner bushings after noticing the driver side was missing the ID metal sleeve, causing the trailing arm to wander
  • Installed 3 inch belt harness with sub belt
  • Replaced rear wheels with better offset and less dents
  • Drilled and safety wired all CV joint bolts after they kept trying to leave the chat
  • Replaced easily clogged air filter and oiled foam cover for a Donaldson enclosure with paper filter
  • Installed Baja Designs sqaudron pros on the A-pillar
  • Installed USB connector with voltmeter since I only have a water temp gauge
  • IMG_6645.JPGIMG_6646.JPG
IMG_6455.JPG

IMG_6460.JPG

IMG_6462.JPG

IMG_6461.JPG


IMG_4426.JPG


IMG_6396.JPG


IMG_1271.JPG

IMG_8617.JPG

IMG_8618.JPG

IMG_8619.JPG


IMG_6689.JPG
 

Attachments

  • IMG_6455.JPG
    IMG_6455.JPG
    324.3 KB · Views: 0
  • IMG_6459.JPG
    IMG_6459.JPG
    310.6 KB · Views: 0
  • IMG_6462.JPG
    IMG_6462.JPG
    292.8 KB · Views: 0
Way better setup than a golfcart in my eyes. Seems like you did a lot of good maintenance and upgrades to make it reliable in the long term
 
Dude! Thing is sweet Thanks for the info, that was all news to me. And ya how was the water crossing haha. It hasn’t been that deep recently since rail road filled it with gravel.
 
The water crossings aren't bad, just go slow, stick to one side, and hold your feet up. It's the multiple stream crossings at speed in Afton canyon in an open-bodied vehicle that will make for a cold ride.
 
So after owning the car for a couple of seasons it developed some cracks at some tube junctions and sheered the horizontal dash bar on the driver's side. I had somebody grind out and fill the cracks and add some gussets to the dash bar.

IMG_4696.JPG

IMG_4698.JPG
IMG_4699.JPG

IMG_4700.JPG

dash.jpg
 
The car was pretty rough in the rzr burn and you really had to death grip the steering wheel to keep it from ripping out of your hands. Something wasn't right on the front end and I started pulling stuff apart to figure out what was going on. It took a little while but what I discovered was the front upper trailing arm was wider than the lower trailing arm at the link pin mount. Because of this the front end was binding through the travel. (The upper trailing arm is more narrow than the lower, and you add a bunch of shims to make up for this offset and set your camber - IDK its some weird German engineering crap).

IMG_1879.JPG
IMG_1878.JPG


trailing arms.jpg
 

Attachments

  • IMG_1877.JPG
    IMG_1877.JPG
    1.7 MB · Views: 0
So with not really knowing what to do about the front end, finding more stress cracks, and a wife who didn't want to sit at camp with a 2 year old, I lost motivation and let the car sit for a season. I finally resolved to "don't get it right just get it running" and started working on it again shortly before the clean up.
IMG_9467.JPGIMG_9345.JPGIMG_9348.JPG
 

Attachments

  • IMG_9348.JPG
    IMG_9348.JPG
    3.2 MB · Views: 0
After taking things apart and lots of measuring I figured out why the offset between the upper and lower trailing arms was so off. The pinch tube where the link pin goes through the upper trailing arm was much wider than the lower arm. The trailing arms look to be custom made so who knows where they got their measurements from. The previous owner tried to make things work by using a thinner beam bushing seal on the upper arms and not using link pin shims, but it was still out of spec. In the end, I took enough material off the upper to make it the same width as the lower, and just added 5mm worth of link pin shins to make up the offset. Sometimes the best solution is the easiest one, just kicking myself for not figuring it out sooner.

IMG_9407.JPGbeam seal bush.jpg
IMG_1068.JPGlink pin shimming.jpg
 
Here is what I had to do to get the car ready for the clean up
  • Replaced the link pin bushings in the spindle
  • Replaced the beam tube seals that go between the trailing arm and beam (upper was plastic and lower was rubber before, you need to use aluminum if you're using coilovers)
  • Replaced the beam bushings and reamed them to fit
  • New hardware for the beam through rods and link pins
  • Replace wheel bearing
  • Replace the rear trailing arm spring plate pivot with Wicked Creations double sheer, heim pivot
  • Alignment front and rear
  • Rebuild rear coil overs
  • Change up the valving in the coilovers front and rear
  • Weld up a couple of cracks
  • Painted front and rear suspension parts with steel it

IMG_9417.JPG

I'm dull and I find it amusing that I drove out the torsion/trailing arm bushing with an explorer torsion bar.

IMG_9468.JPG
 
The first thing you learn when shock tuning is you want to make one change at a time so you can note the difference and revert back if need be. So of course I made a bunch of changes at once while I had the shocks apart.
The front coilovers had 45 rebound, 35 compression, and 2 open free bleeds. The rears had 80 rebound, 65 compression, and 2 open free bleeds. Seems to me there was too much rebound damping and not enough compression damping.
I changed it up so the fronts are 40 rebound and 55 compression and rears are 40 rebound and 75 compression. I took some of Partybarge's general shock tuning advice and applied it to the front and rear. I took one of the washer's under the nut and placed it between the compression stack and the top out washer (you need at least 1/16" between the compression stack and top out washer to prevent high speed pressure spikes). I took a .015 X 1.6 shim and placed it on top of the compression stack for a flexy rate plate (this will increase damping on high speed hits but leave the mid range alone). And I drilled out a free bleed for 3 open free bleeds (to help with low speed/chatter).front original.jpg

IMG_2020.JPG
 
I will say I got pretty lucky with such a huge swing. Overall the car rides better and it now handles the chatter much better. The chatter in the soft sand is tolerable and the car can get on top of them and smooth it out. The chatter in the hard pack still isn't great though. I need some better springs and some recording of the suspension in action, but this was good enough for now. Superstition Run Video
 
I went out to Superstition on the Friday after Thanksgiving. We were a little slow getting down there and I missed the group ride, which turned out to be a good thing. While I was farting around camp the steering started to feel a little off and as I approached a wash with high canyon walls I lost the passenger tie rod bolt, the car made a sharp right, and I slammed on the brakes to keep from hitting the canyon wall. I had another bolt to get me back to camp but I thought it might be a weekend killer since I also lost the mis-alignment spacers and bushing adapters for the spindles. My stepdad and I Macgyvered a fix by hammering shock bolt spacers into the spindles and cutting up some other steel spacers for the misalignment spacers. The bolt shank was too long so we added a couple washers to make sure the nut wasn't bottoming out. It was a good enough fix for one long ride. I'm stilling trying to find a replacement shoulder bushing though.

IMG_2126.JPG


IMG_2166.JPG
IMG_2165.JPG

IMG_2164.JPG
 
For the group ride we started at Huff road at "the dip", went past the prison corner to the wash and had our first stop at the little trestles. From there we headed to the Sand Bar under Evan Hewes hwy, hung out for a bit, went back to the trestles, took the pole line road to the bombing range tower, and then headed towards Sand Dam. When we got to the sand highway the group stopped and I slowed down and picked a bad line, which ended with me getting stuck. I attempted a self recovery but just gave all my passengers a nice sand shower. A 4 seat RZR tried to yank the car out and toasted a belt. My stepdads V8 car pulled me out backwards, then he got stuck, and then a 4 seat cam an winched him out. Had 2 or 3 guys just gave me a push it would have been enough, haha. From there we hit Sand Dam, spectated a bit, and did a couple of runs. We took the side way out through the dunes heading toward Wheeler rd. At that point it was getting dark and we made one last stop at the water tower before making it to camp.
 
Last edited:
Back
Top